wesdotphotography.com
visit us:
  • Home
  • Autos and Vehicles
  • Nature and Animals
    • Animals >
      • Animals
      • Canines
      • Cats
    • Birds >
      • Birds
      • Eagles and Osprey
      • Hummingbirds
      • Owls
      • Tall Birds
    • Equine >
      • Everything Horses
      • Lipizzans
      • Wild Horses
    • Flora
  • Pacific NW
    • Japanese Gardens
    • Mountains
    • Night Skies
    • Ocean
    • Pacific Northwest
    • Portland
    • Waterfalls and Streams
  • People
  • Travels
    • Alaska
    • California
    • Desert Southwest
    • France
    • Northeast
    • Rocky Mountain States
    • Yellowstone and Tetons
  • Unique Art
    • Abstracts
    • Triptychs
  • About Us
    • Blog
    • Forum
    • Contact Us
    • Legal

2024 KENYA ITINERARY

7/20/2024

0 Comments

 
Picture
 1) 8/23 Arrive Nairobi

2) 8/24 Nairobi to Amboseli: stay at Elephant Gorge Camp

3) 8/25 Amboseli National Park

4) 8/26 Amboseli National Park to Lake Naivasha

5) 8/27 Lake Naivasha

6) 8/28 Lake naivasha: Masai Mara

7) 8/29 to 8/30 Masai Mara

8) 8/31 Masai Mara to Lake Elementaita Serena Camp

9) 9/1 Soysambu conservancy and Pejeta Conservancy

10) 9/2 Pejeta conservancy to Samburu

11) 9/3 Samburu

12) 9/4 Samburu to Nyeri

13) 9/5 Nyeri to Nairobi 
Highlights of our trips:
  • Elephants and other wild animals that will be walking freely through some of our camps.
  • We will be hopefully photographing elephants as they walk in front of Mt. Kilimanjaro at sunrise. Or whatever other animals that might grace our view.
  • Flamingos on the several lakes we will visit.
  • Fingers crossed that we catch some of the great migration of wildebeast, zebras and other game crossing rivers. It's the right time of the season but being wild animals luck will need to be with us.

  • Visiting a Masai Mara village.
  • Visit Pejeta Conservancy with a large variety of animals but is also one of the few places in the world that you can see the northern white rhino. The conservancy houses four of the seven northern white rhinos living in captivity – they are generally considered extinct in the wild.
  • Visit a Masai market and shopping mall.

0 Comments

KENYA AFRICA TRIP OF A LIFETIME COUNTDOWN

7/19/2024

0 Comments

 
Picture
Thirty two days until I am on my once in a lifetime trips.....Kenya. I will be leaving on August 22, 2024 and returning on September 6, 2024.

So excited to see animals roaming free! Like this cheetah that I photographed at Wildlife Safari in Winston, Oregon. This is one of two siblings celebrating their first birthday. So very rambunctious and still kind of fluffy. Hard getting a decent shot through the cage wires.


Wildlife Safari began breeding cheetahs in 1972 and successfully produced a litter the following year. Since then, 241 cheetahs have been born at the park, making Wildlife Safari the second most successful breeding center on Earth and the top center in the Western Hemisphere.

I will be blogging here as much as time and WiFi allows.  If you would like to follow along on my journey please follow my blog.  Or follow me at www.facebook.com/wesdotphotography or www.instagram.com/wes_dot_photography/

0 Comments

THE MAGIC OF GENERATIVE FILL

2/17/2024

0 Comments


Picture
Picture
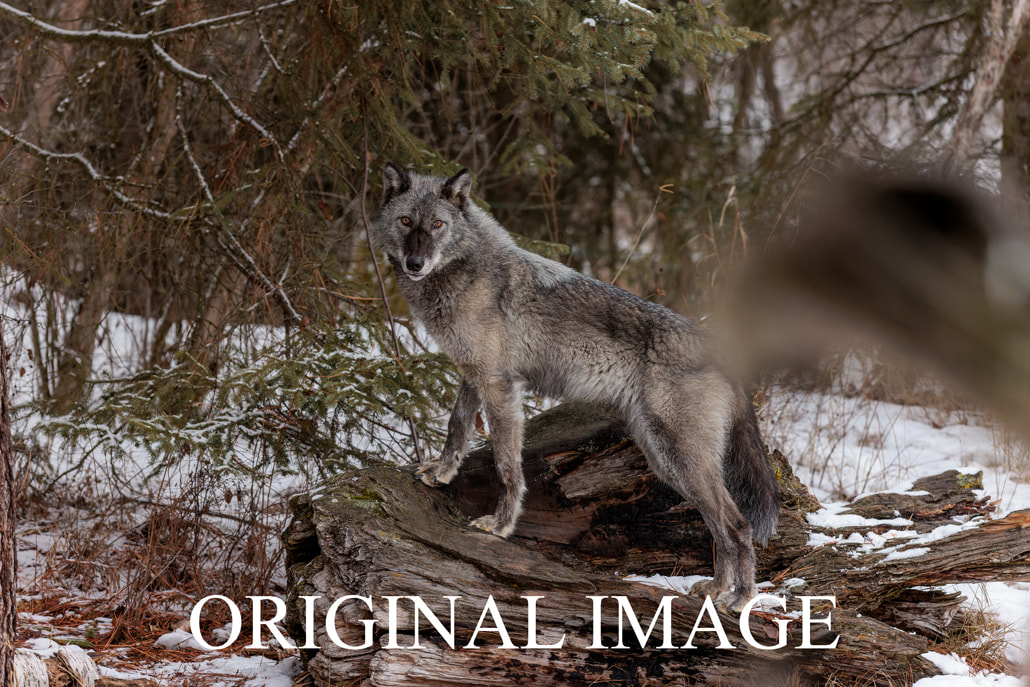
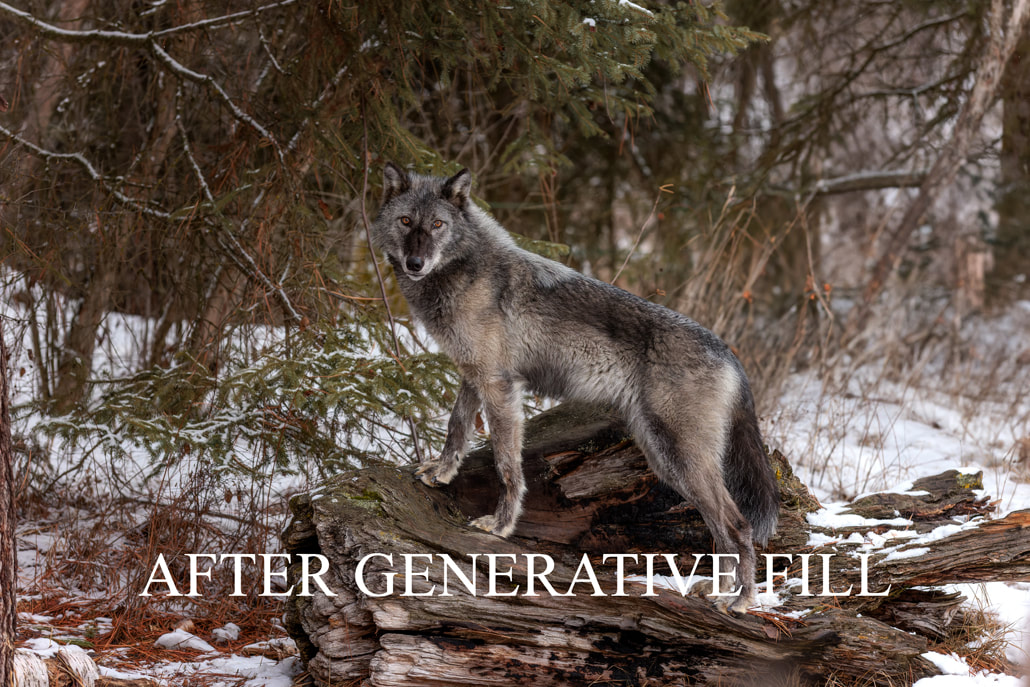
Generative fill is a new feature available on Adobe Photoshop. In a nutshell you can select a portion of your image and by using text/prompts you can fill that area with anything you can imagine. The magic of Artificial Intelligence is here to stay whether you love it or hate it. It's far from perfect but you can completely change a background or a small segment.
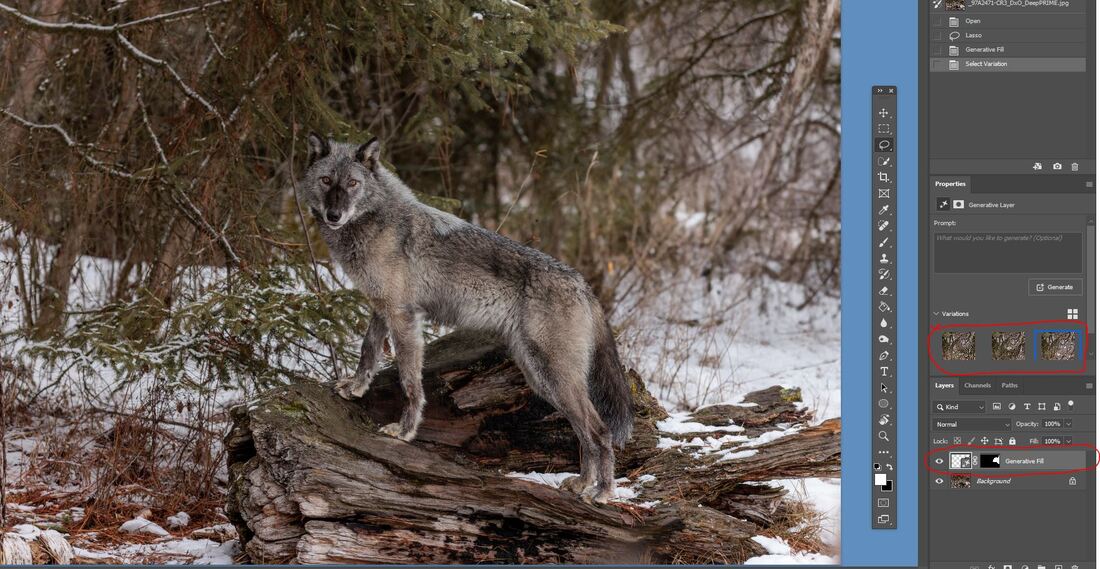
But here is another way to use the Generative Fill. I didn't notice a log very close to me was blurred and covered the back of the wolf until the wolf was done standing there and jumped off. Generative Fill very effectively and quickly saved this image.
Picture
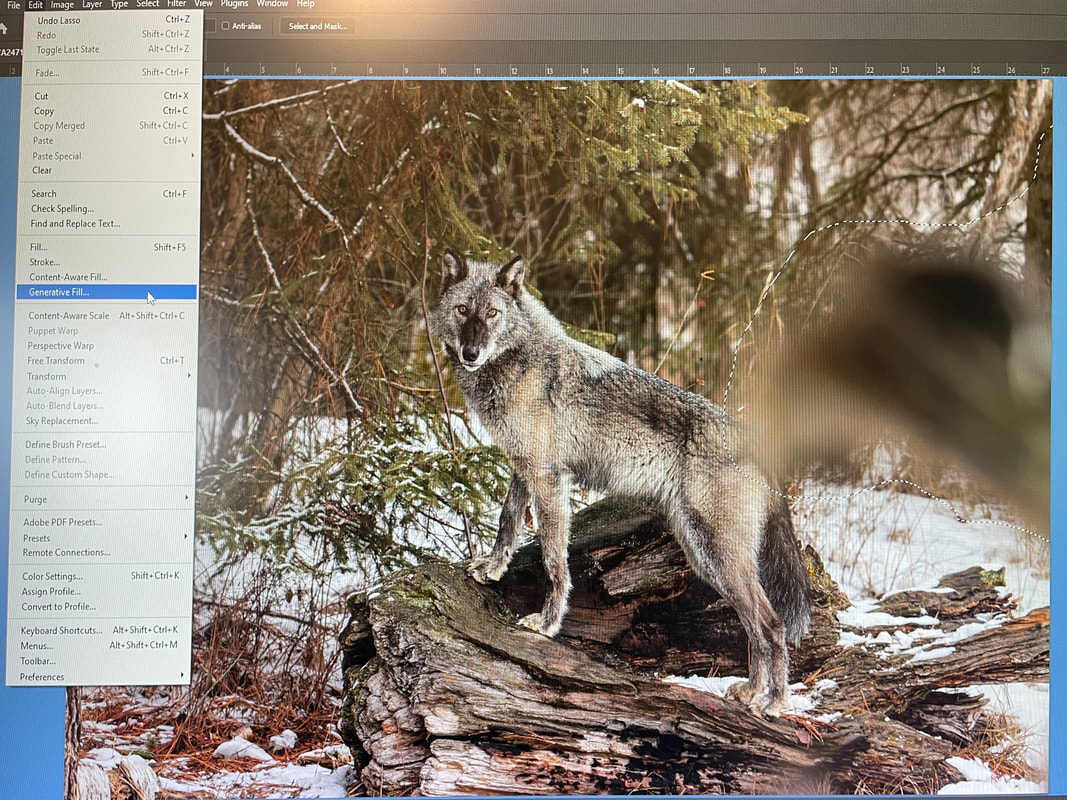
Select the area that you want to replace as in the image above. Then in Edit select Generative Fill. Do not click on Generate yet.
Picture
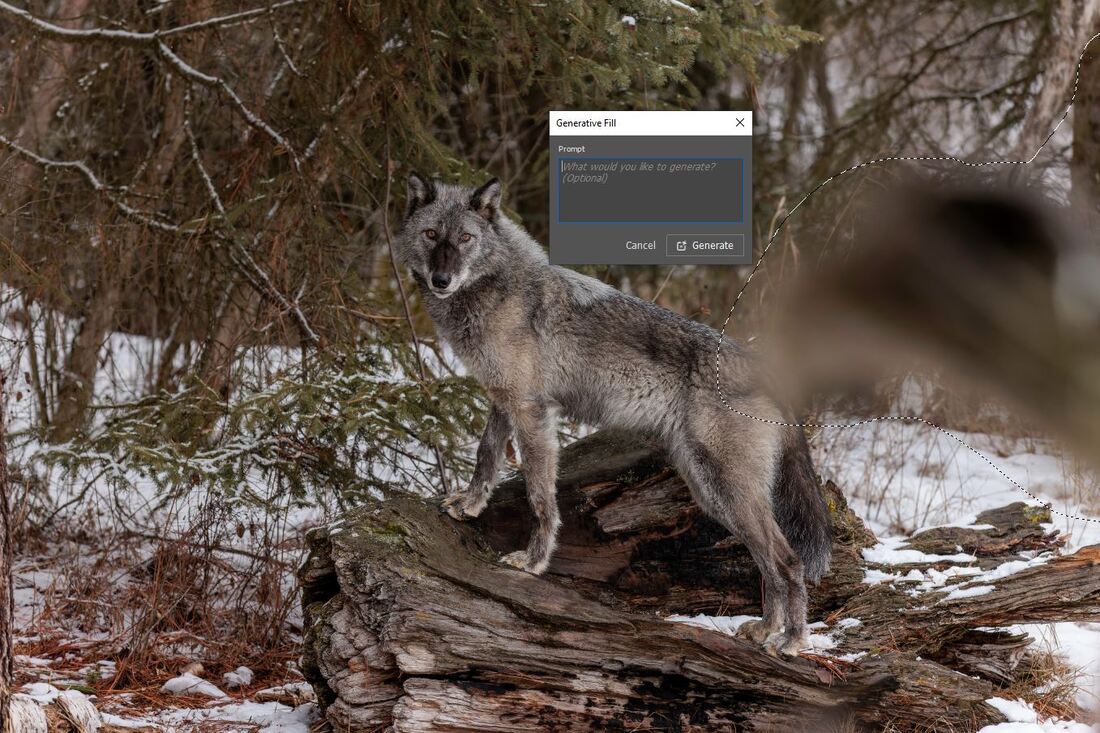
Instead of typing anything in the prompt box LEAVE IT BLANK. What Photoshop will do next is gather the information from all the surrounding pixels and give you 3 different options to fill the selection with.

Click on Generate and you will receive a new layer with those options to pick from.
Picture
 Then Click on each of the three variations to see which one you like. If you like none of them simply click on Generate box above the variations and Photoshop will give you 3 new variations.
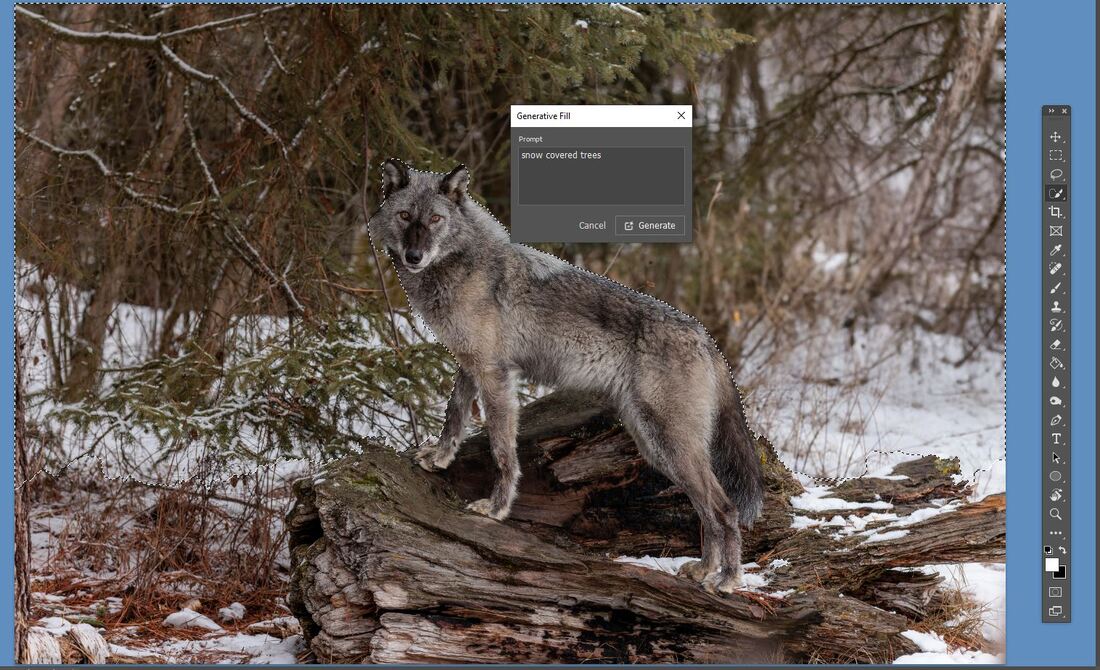
If you really want to go further and remove the entire background continue reading the steps below.  After I flatten the layer I am going to now select all of the background and enter snow covered trees in the prompt.  Then click on Generate.
Picture
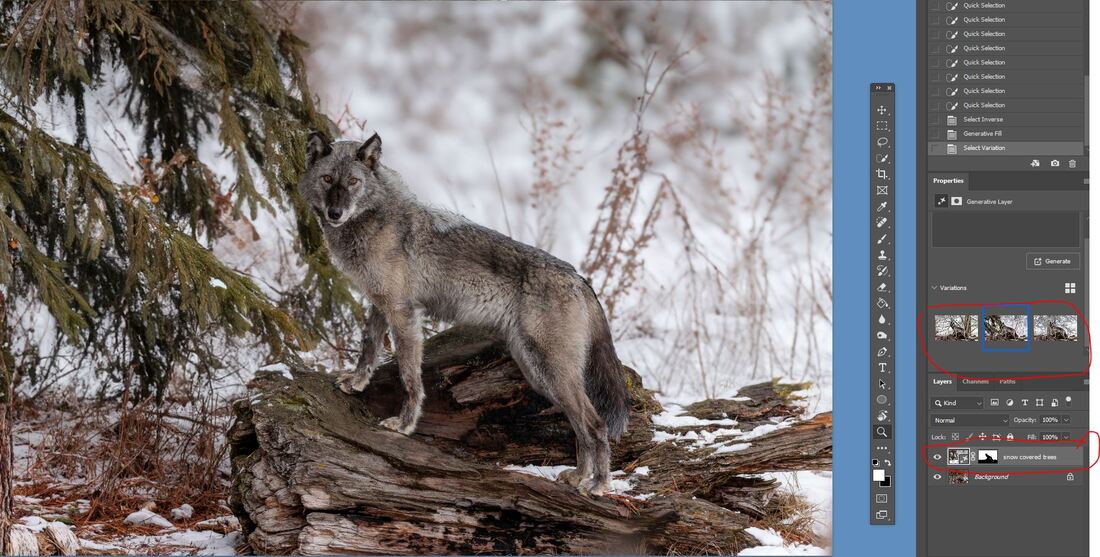
As the image below is just an example of what can be done I made a very sloppy selection.  Spending some more time on the selection and then using the mask in the layer can improve on the process immensely.  But I wanted to show you what can be done beyond removing unwanted objects in an image using the existing pixels in the original image.
Picture
0 Comments

ADAMSKI EFFECT – PART II

6/22/2023

0 Comments

 
Picture
This is a slightly more difficult version of applying the Adamski Effect to an image as it includes a person. Most of the steps are similar to in Part I but there are some variations and additional steps.

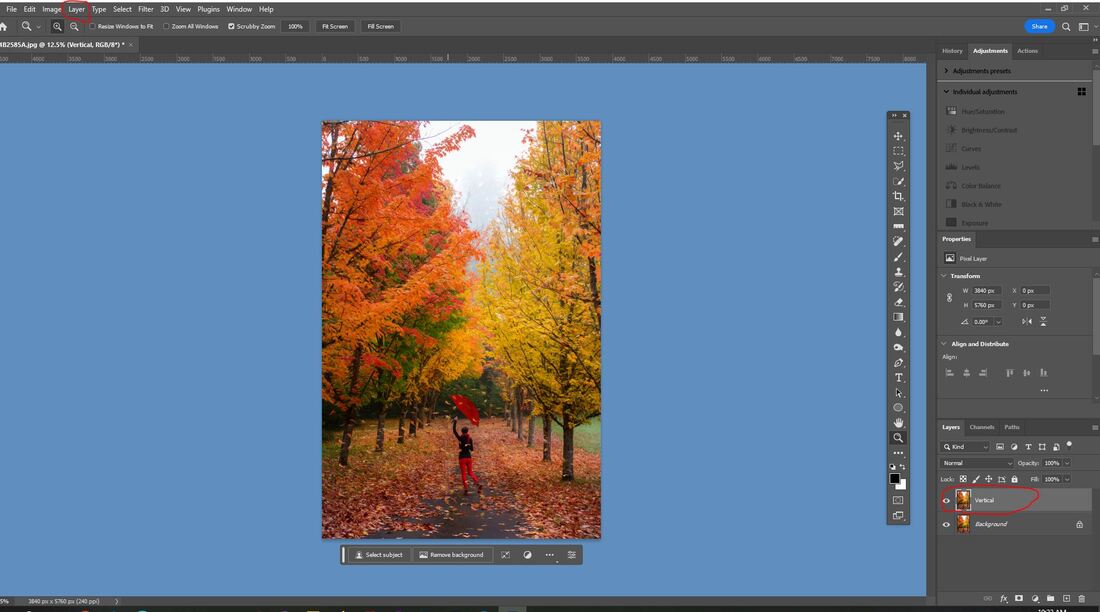
First step is to create a duplicated layer from the background layer. To do this right click on the background layer and select Duplicate Layer or with the PC keyboard shortcut do a Control J. As I am only doing a vertical blur with image there is only one duplicated layer which will be renamed 'vertical'.
Picture
With the Vertical layer selected go to the Filter Tab, from the drop down box select Blur then Motion Blur. Type -90 in the Angle field to make the blur vertical. I will use 840 in the Distance slider for this image. This is purely your choice. The higher the number the more blur. Then click OK.
Picture
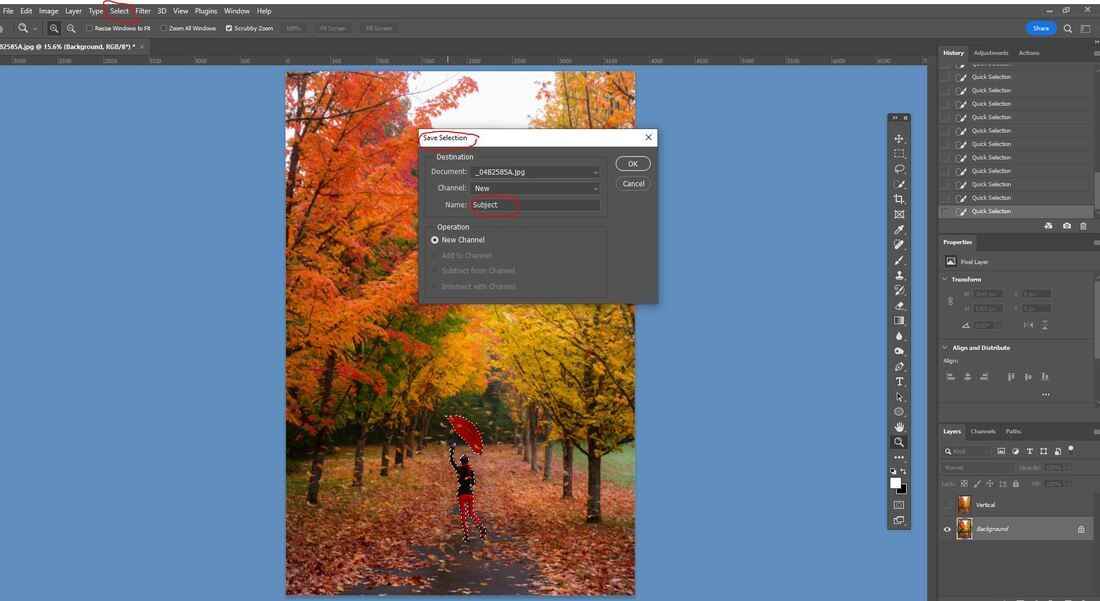
Click on the icon next to the Vertical layer to make it not visible. Then select the Background layer and click on Select then Subject. This will select the person in this image and does a pretty good job. It would be useful to zoom in and do any touch up needed. Then click on Select and Save Selection, naming it Subject and click on OK.
Picture
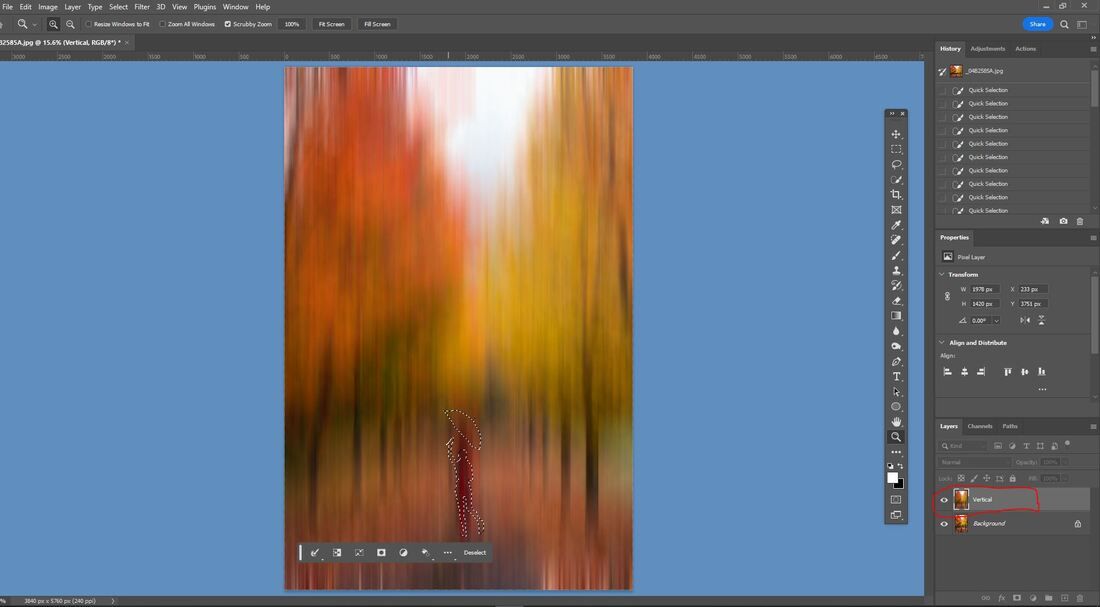
Click on the Vertical layer which will make it visible again and you will see the subject is still selected. Add a Layer Mask by clicking the icon in the bottom of the Layers Palette.
Picture
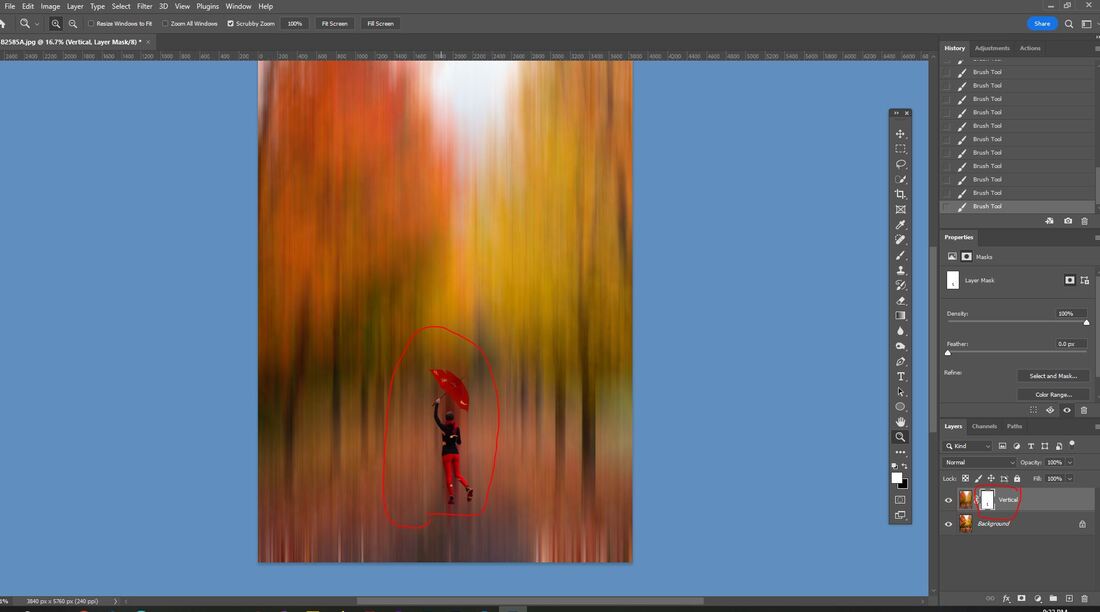
The mask is black which is hiding the subject.
Picture
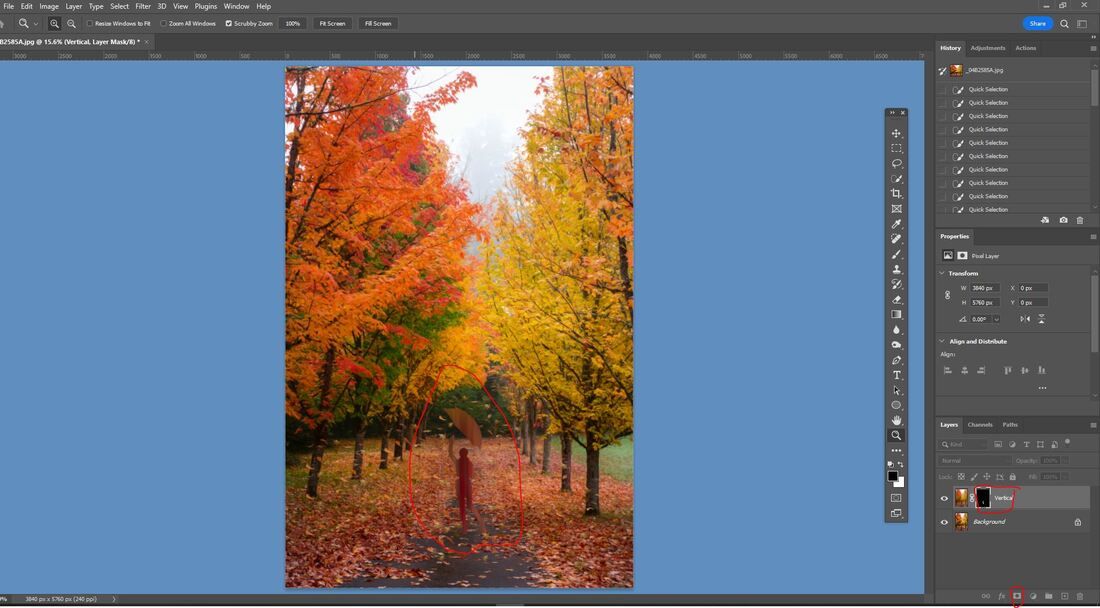
To change the blur from the Subject to the Background click on the black Layer Mask and do the PC keyboard shortcut Control I to invert the mask. Zoom in close to again do any touch up.
Picture
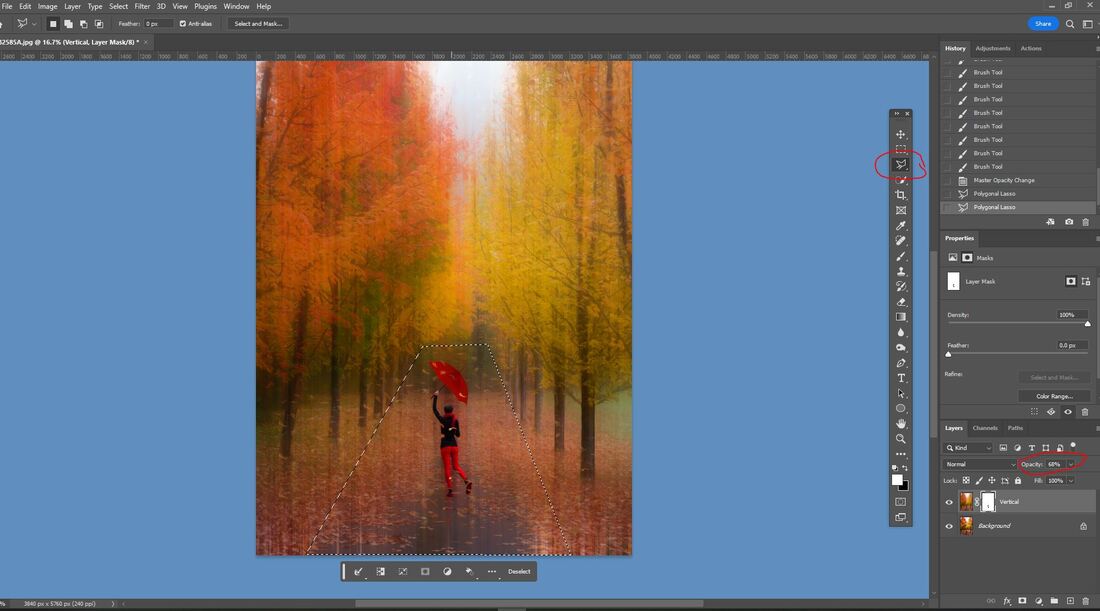
Lower the opacity on the Vertical Layer so you can see the background. Then using the Polygonal Tool select the area that you want to reveal.
Picture
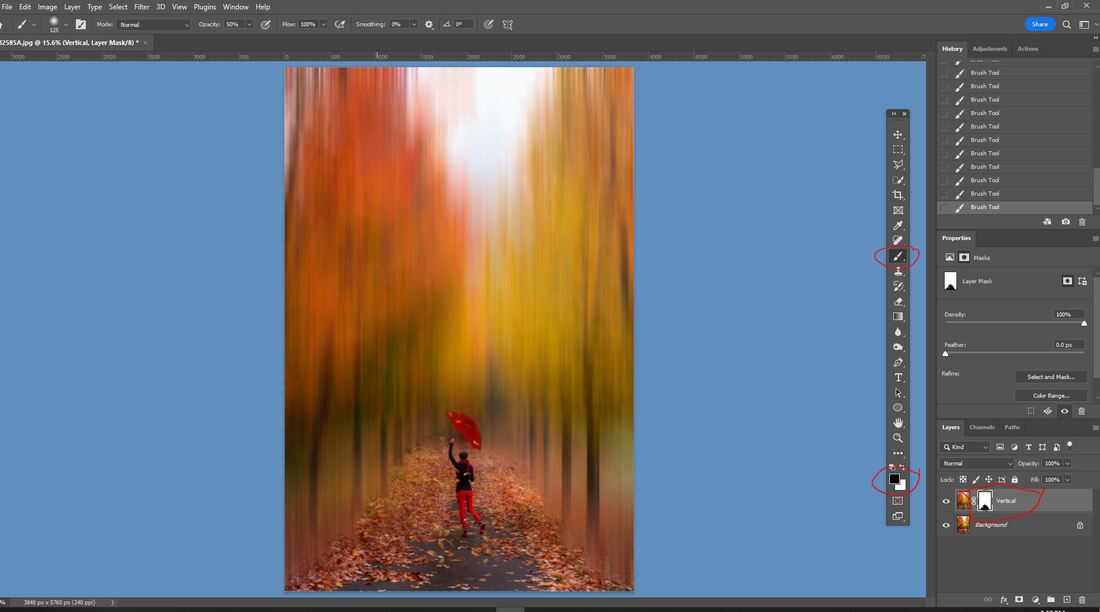
Using a large soft black brush set the Opacity to 10-15%. Start brushing on the Mask at the bottom and brush towards the top until you have the look you want. The effect will be contained within the selected area framed by the 'marching ants'.  The bottom should be black and fading to gray towards the top of the selection.
Picture
Deselect the Polygonal selection and lower the opacity of the layer. Using a smaller soft black brush brush along the edges of the blurred area and the leaves. Toggle between the black brush to reveal and the white brush to bring the blur back if you've removed too much. Also toggle between a lower opacity and 100% opacity to see the progress. This is probably the most time consuming part of the edit.
Picture
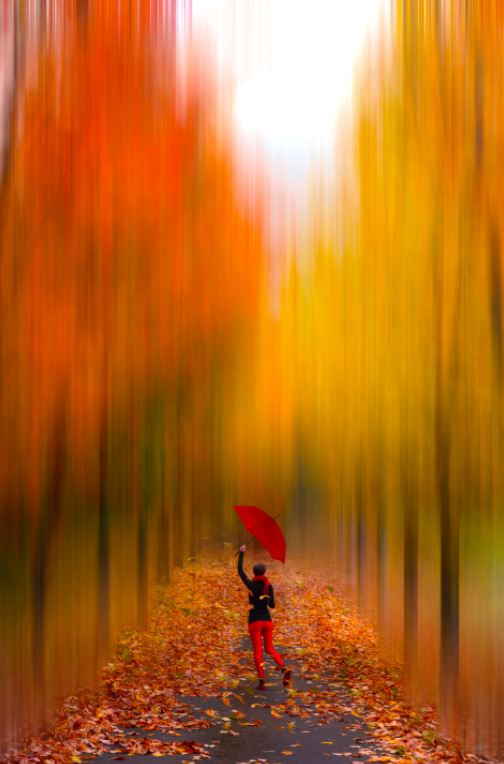
From here I flattened the layers and then duplicated the background layer to remove the leaves from the umbrella. I found them way too distracting. Here is the finished project.

Picture
0 Comments

ADAMSKI EFFECT – PART I

6/22/2023

0 Comments

 
Picture
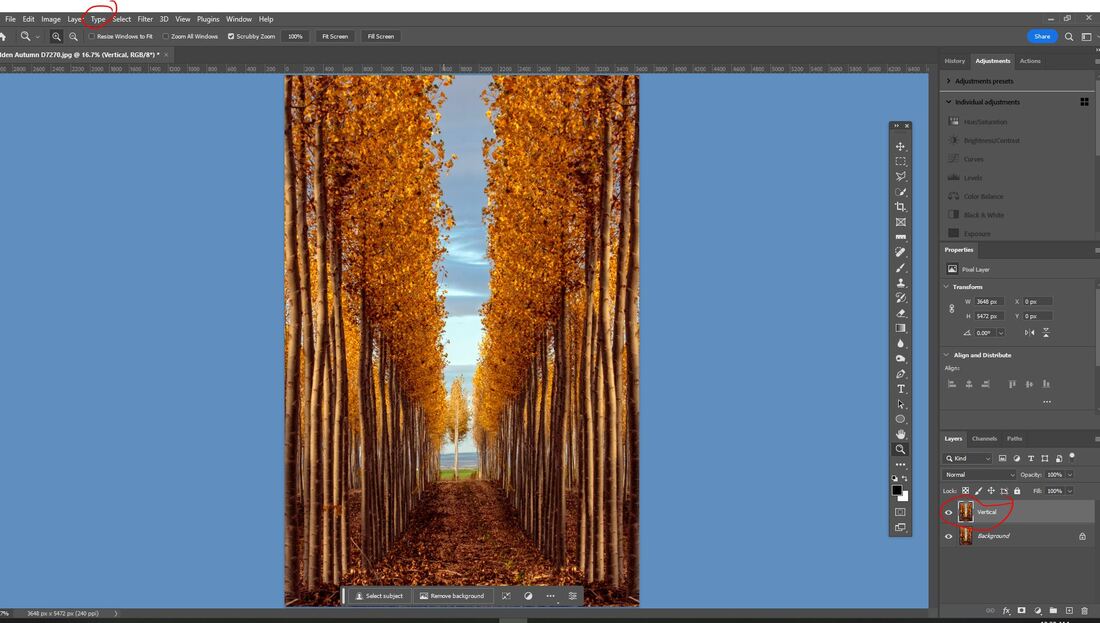
First step is to create a duplicated layer from the background layer. To do this right click on the background layer and select Duplicate Layer or with the PC keyboard shortcut do a Control J. As I am only doing a vertical blur there is only one duplicated layer which will be renamed 'vertical'.

Picture
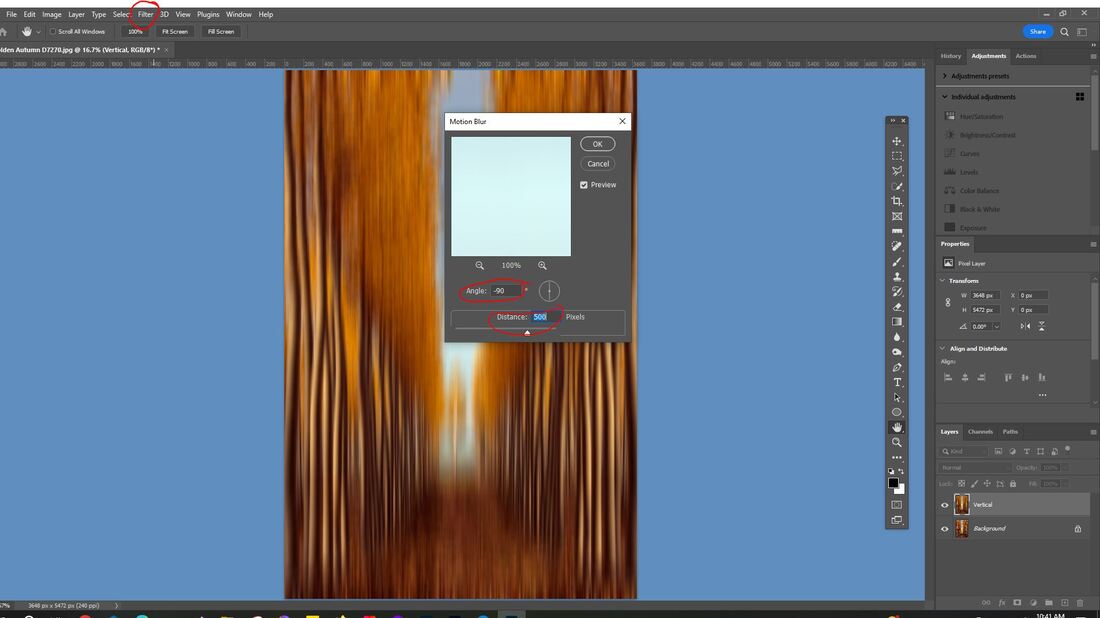
With the Vertical layer selected go to the Filter Tab, from the drop down box select Blur then Motion Blur. Type -90 in the Angle field to make the blur vertical. I will use 500 in the Distance slider for this image. This is purely your choice. The higher the number the more blur. Then click OK.

Picture
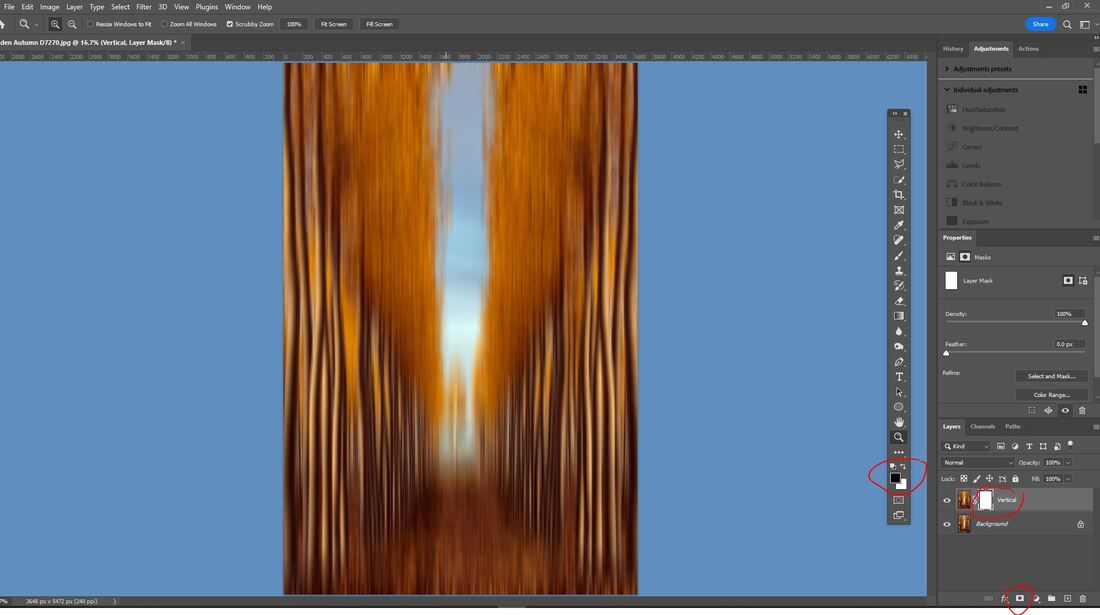
Add a Layer Mask by clicking the icon in the bottom of the Layers Palette. The mask should be white and the foreground color palette should be black.

Picture
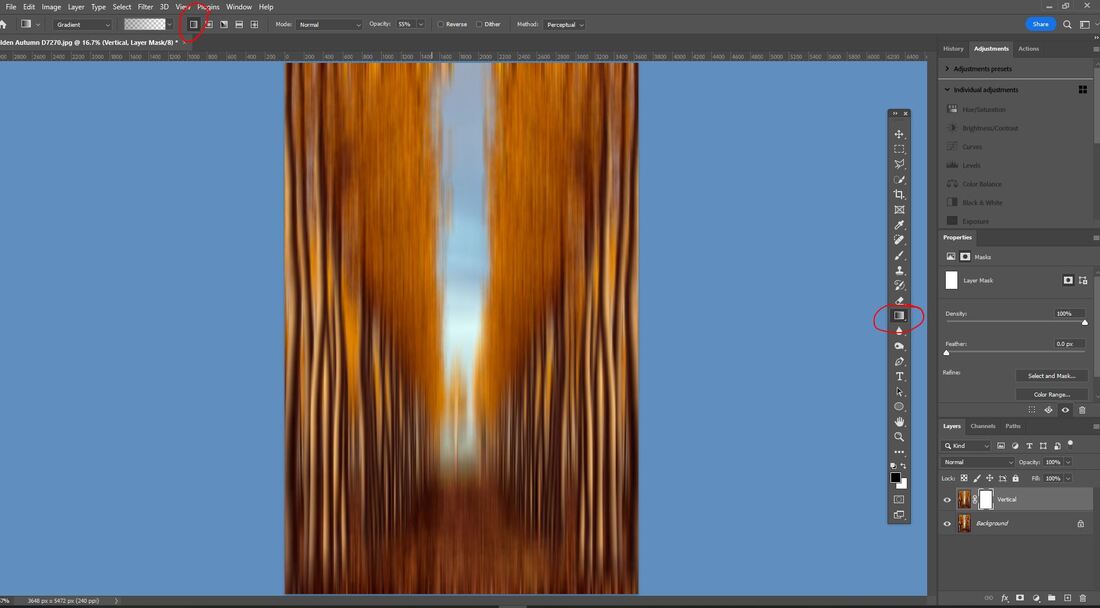
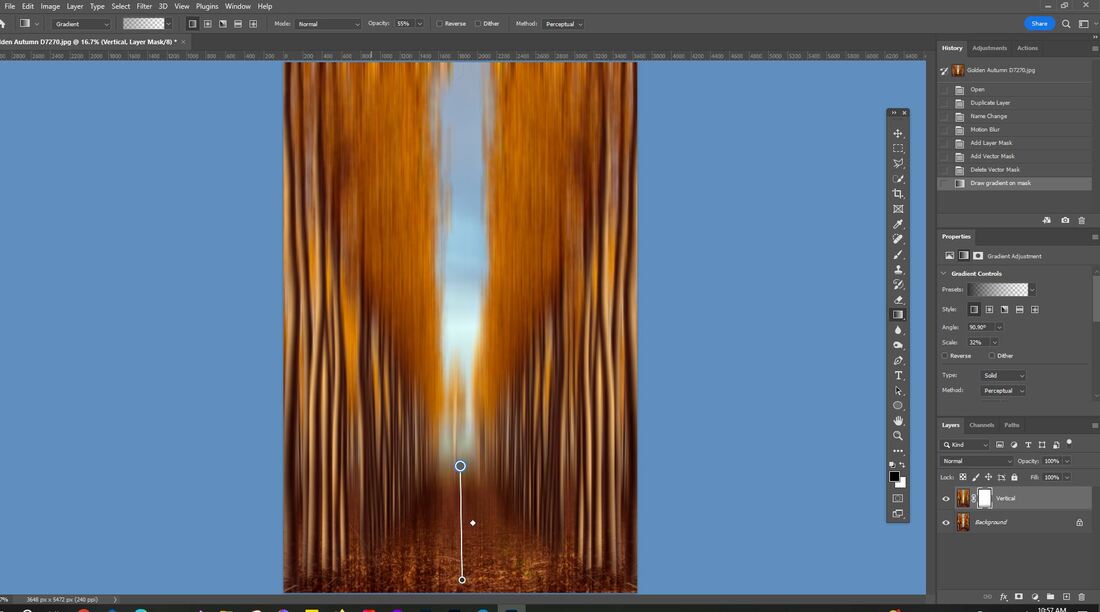
Select the Gradient Tool in the tools bar or with the PC keyboard press the letter 'G'. Make sure the 1st Icon next to the Gradient bar is selected. It is called the Linear Gradient.

Picture
Making sure the Mask is selected on the Vertical layer hold the Shift key and click near the middle bottom of the image and drag up a slowly to maybe an inch or so. You will see the lower portion of the image being revealed.

Picture
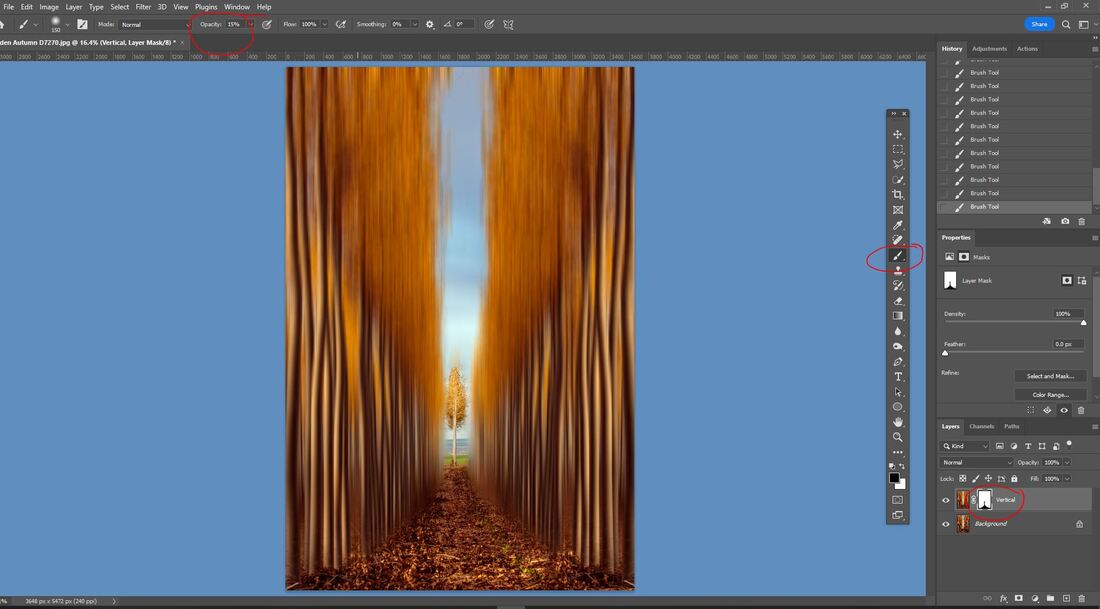
Using a large soft black brush set the Opacity to 10-15%. Start brushing on the Mask at the bottom and brush towards the top until you have the look you want. The bottom should be black and fading to gray towards the top of the selection. Continue brushing along the edges of the blurred area and the trees. Toggle between the black brush to reveal and the white brush to bring the blur back if you've removed too much. Also toggle between a lower opacity and 100% opacity to see the progress. This is probably the most time consuming part of the edit.

Picture
Flatten the layers and do a Save As naming the file. Here is the finished project.

Picture
0 Comments

CANON BATTERY LIFE

5/31/2023

0 Comments

 
Picture
Key information regarding how to understand the Battery Information found on the Wrench tab in your Menu screen on your Canon camera. And how to understand what it is showing you.

Not every Canon body will have the same data but will be similar.

• Remaining capacity
This is the remaining capacity of the battery that is currently in your camera. This will show the percentage of charge remaining in the battery.
• Shutter count
This shows how many times the shutter was triggered for still images on this battery. Every time the battery is recharged the number is reset.
When the number on the shutter count starts dropping it is a sign the battery condition is starting to deteriorate.
• Recharge performance
This shows the battery’s condition.
Batteries will not last forever. It is estimated that a battery will last between 500 and 1000 recharge/discharge cycles.
There are many things that influences the life of your battery. One of the key factors that can affect battery life is recharging it before it is almost drained. Shooting a few images and then charging the battery will shorten its life far quicker than using the battery until it is almost drained and then recharging it.
Performance guide
Here's what the colored bars mean on the Recharge performance menu item.

Picture
Three Green Bars: The battery will give full performance each time it’s charged.


Picture
One Green Bar: The battery is still useful but nearing it end. A full recharge will not deliver the same performance as a new battery.


Picture
One Red Bar: The battery has reached it's end. Time for a replacement.


0 Comments

Adding Background Light in Lightroom and Saving as a Preset

4/19/2023

0 Comments

 
Picture
Here is the original image:
Picture
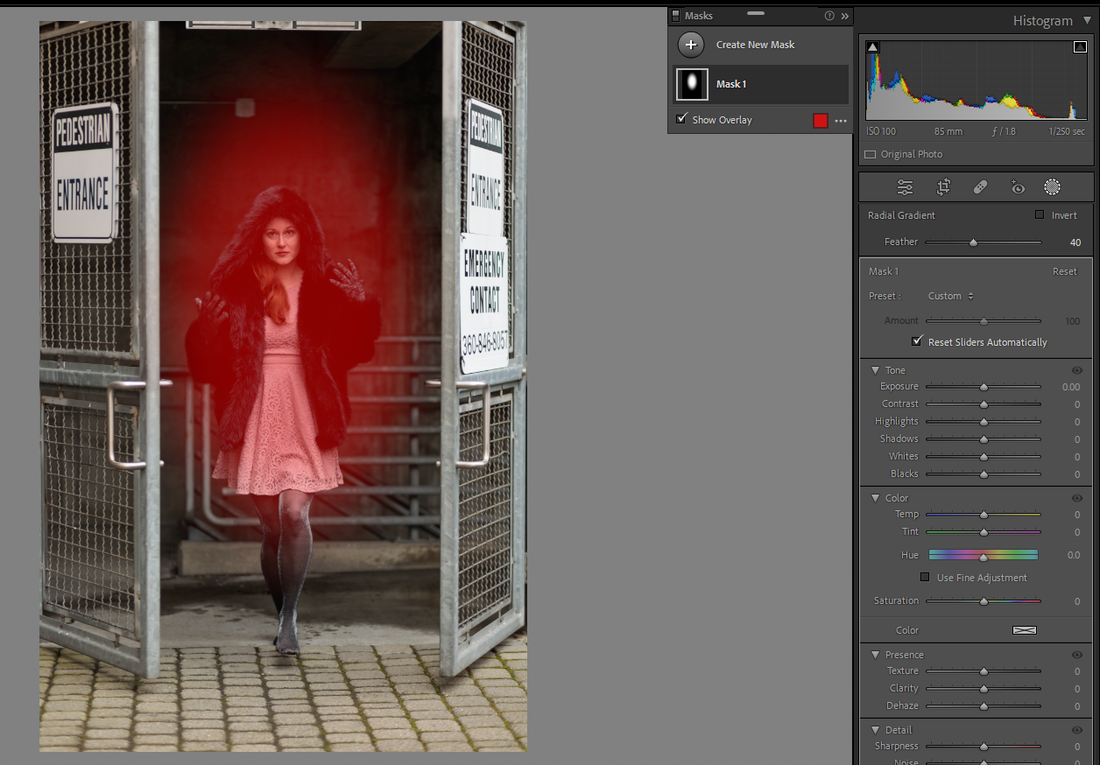
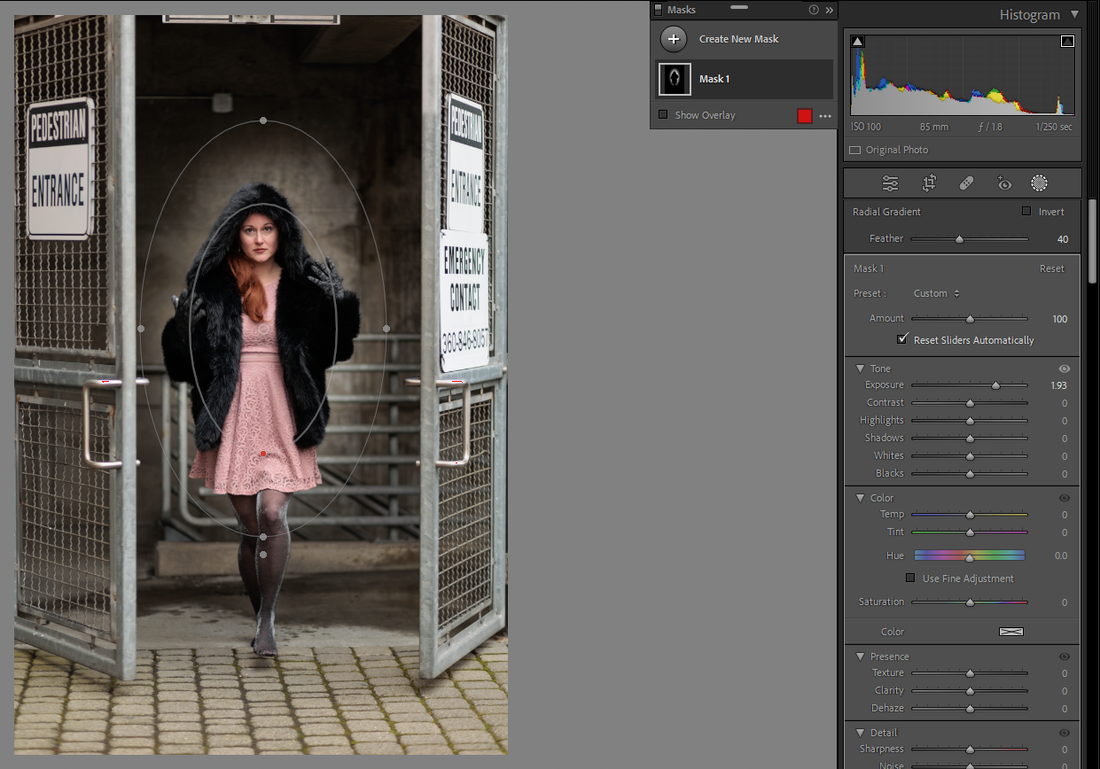
First Step is to add a Radial Gradient mask.
Picture

Then click and drag the Radial Gradient mask to your liking. The mask area will show as red.
Picture
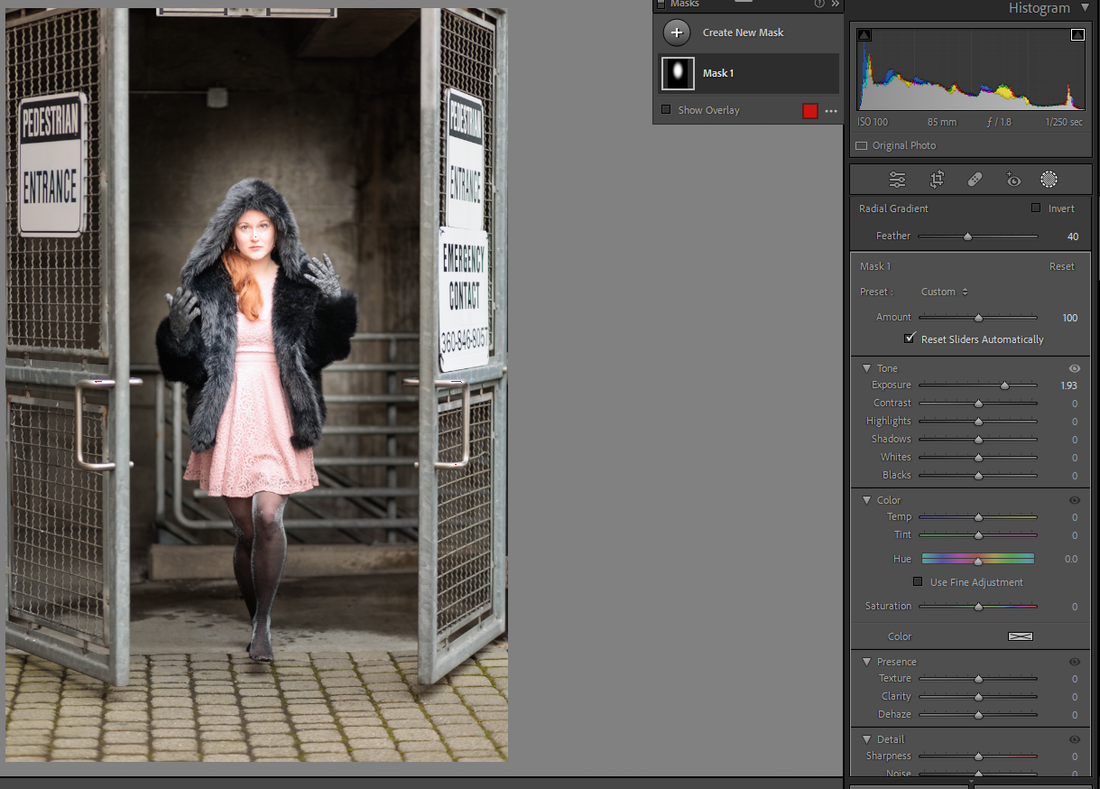
Then change the lighting to either darken or lighten. In this case it is lighten.

Picture
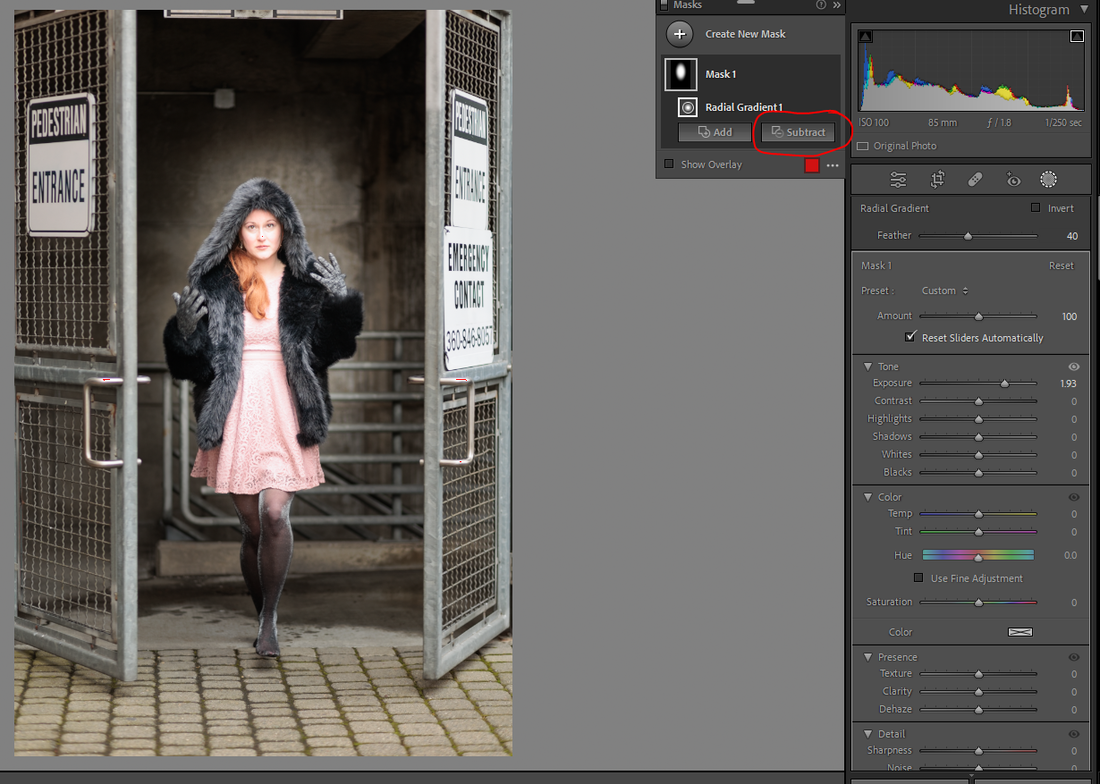
To make the light show only behind the girl click on Mask 1, then click on subtract which will bring a drop down box. Click on 'Select Subject' not 'Select People'. If there was a prop like a chair or if she is holding something it will not be selected in the mask unless you 'Select Subject'.

Picture
Now the subject is no longer lit by the Radial Gradient but the area behind her is.

Picture
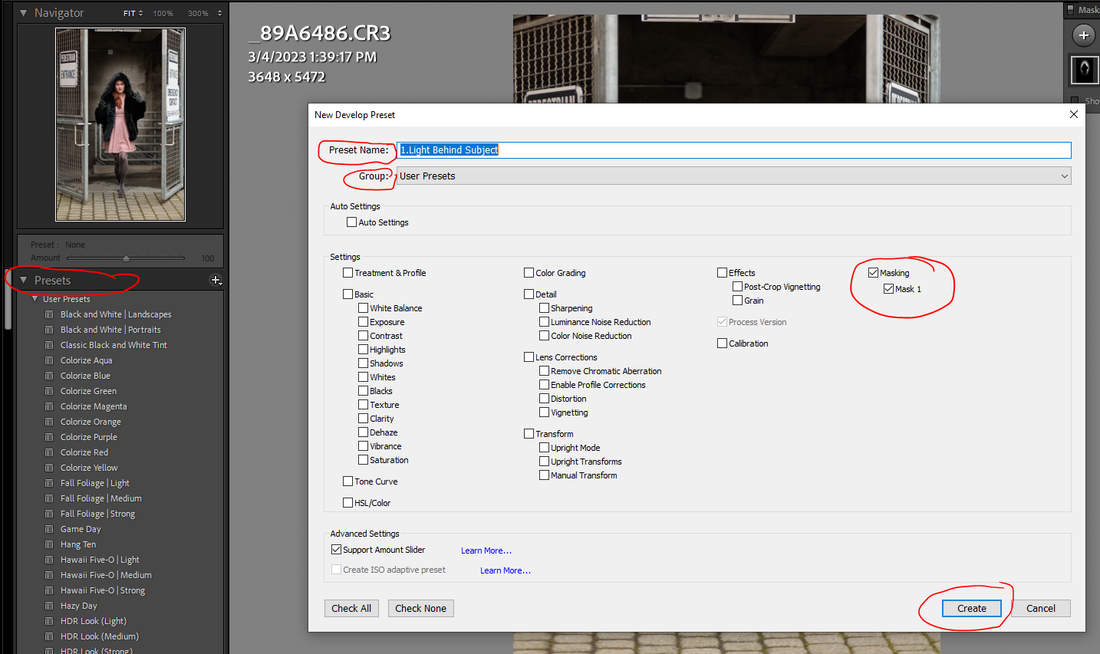
At this stage save as a Preset so it can be used on other images. Rename it something like 1.Light behind Subject, select 'User Presets' as Group and only check Masking. I add the '1' to the Preset name so it will be at the top of my list. It can always be renamed after it is saved if you want to.

Picture
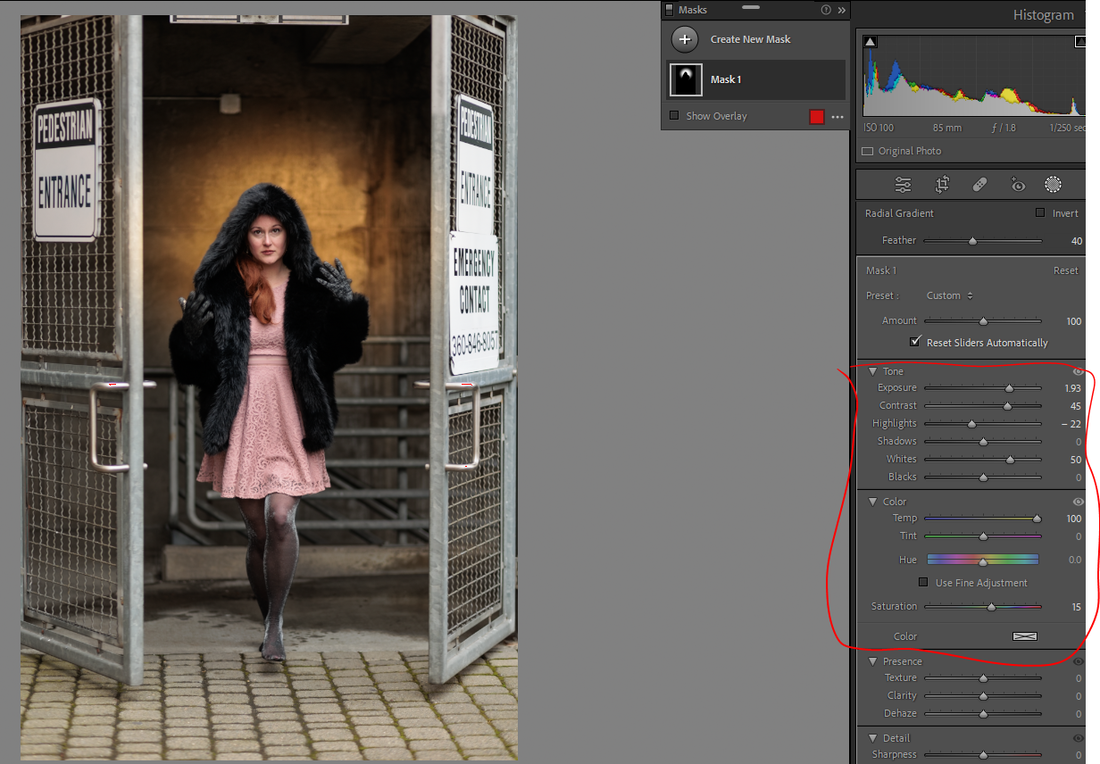
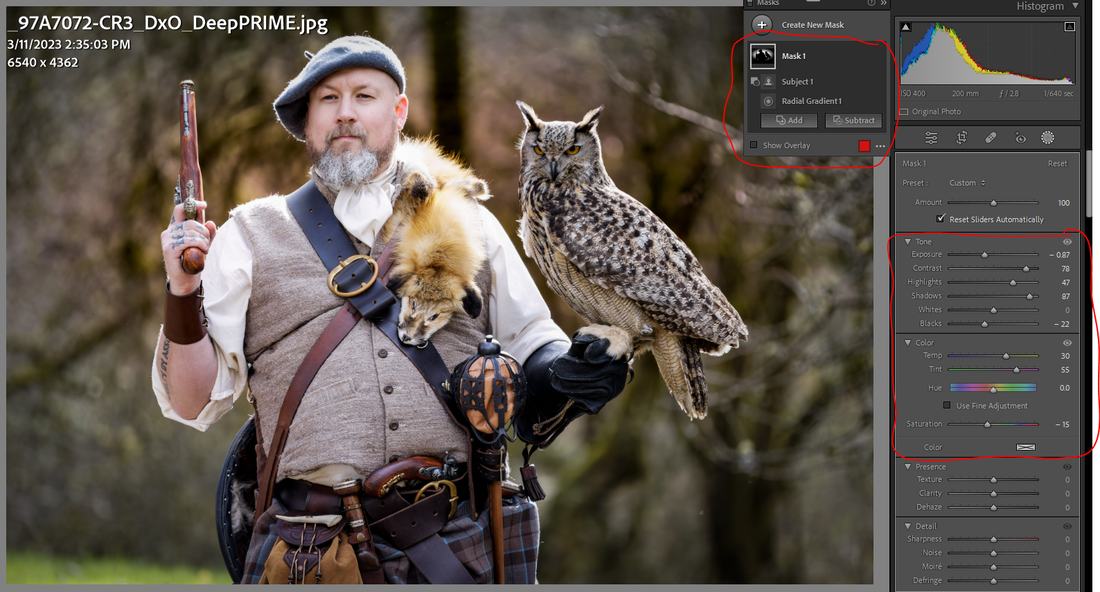
The size, shape, and placement of the mask can be changed by clicking on the mask in the image and making your adjustments to taste. You can also make many other changes to the mask like seen below:

Picture
And since the first steps before adjustments have been saved as a Preset it can now be added to other images and all the same adjustments as shown above can be made.

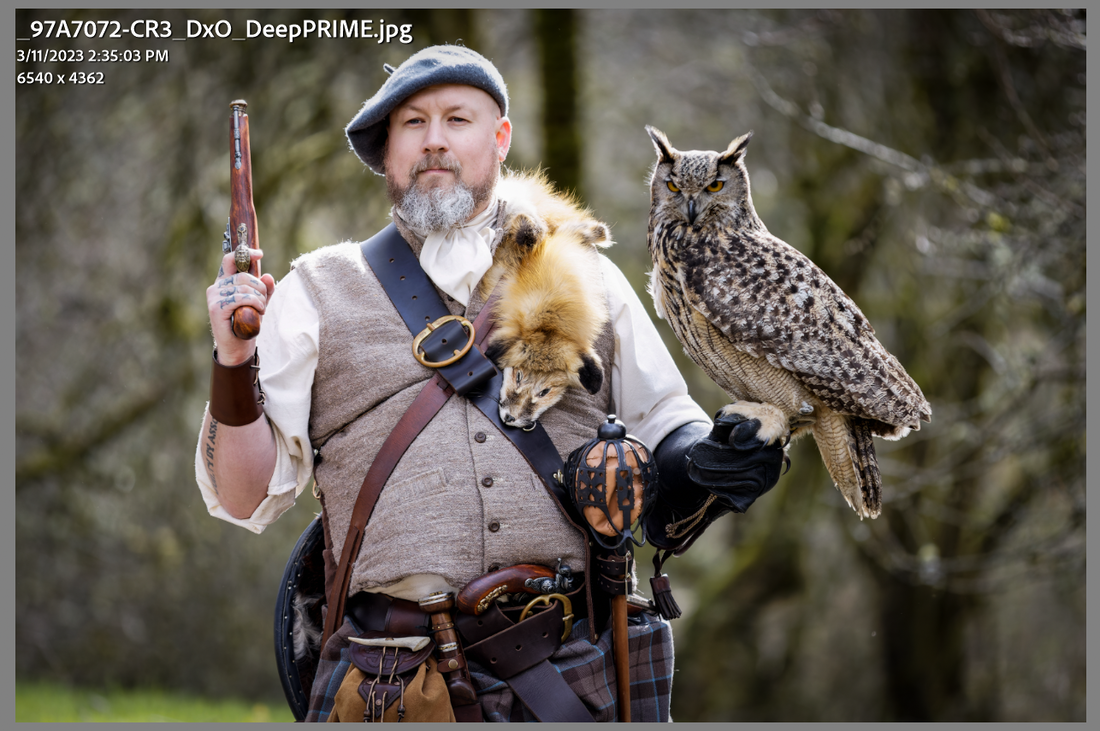
Here is a different image before the Preset was added:

Picture
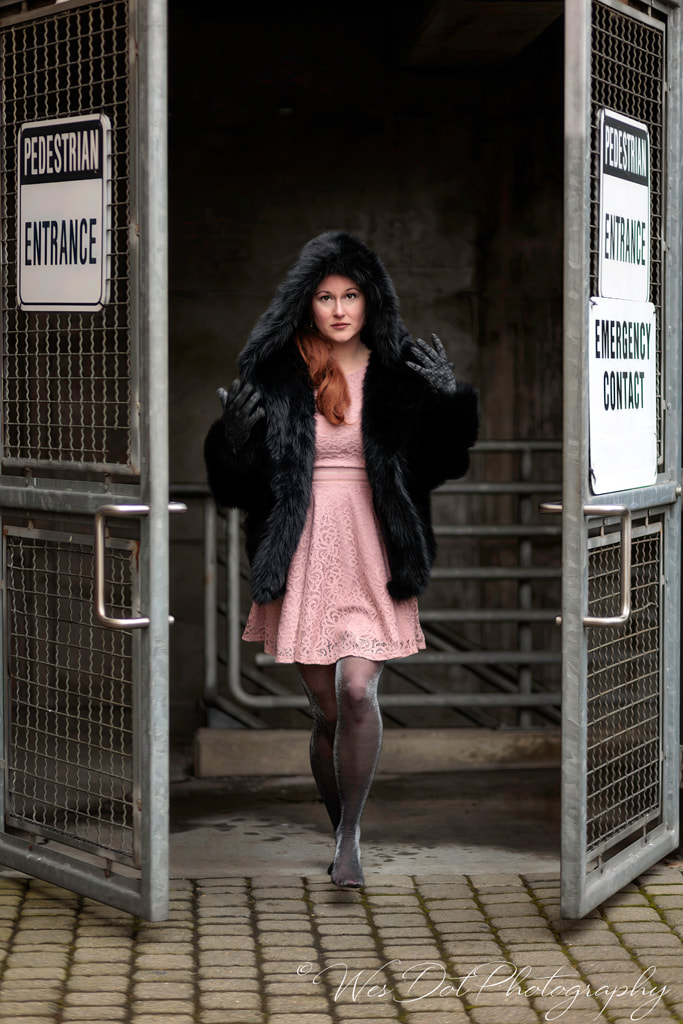
And the same image after adding the Preset by one click and then making some adjustments to show the difference.

Picture
Thank you for taking the time to check out my tutorial.  And if you enjoyed it please comment and follow my Facebook page where I will be posting a link to my Blog. 
I will try to do more tutorials as I find things that I also want to remember and use.
Thank you for your support.
0 Comments

Preparing Copyrighted Images for Social Media

4/29/2022

0 Comments

 
Picture
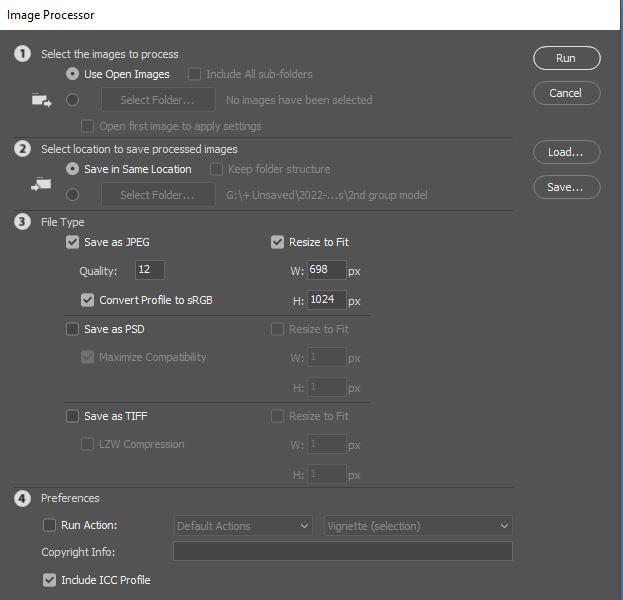
This is the Scripts screen that I use to copyright several portrait oriented images at once to post to social media.  This screen is located under the File tab in Photoshop.

1)   Open one or several images that are all of the same format.  For this example we will open up several portrait images from Adobe Bridge.  To open several completed JPEG images click on each image holding the Ctrl button down.  This will select each image.  Then either click enter or right click on one of the selected images and then select 'Open in Adobe Photoshop'.   All images will appear in Photoshop with the active image in the preview area of your screen and all others in the tabs above the preview.  That is if you have your Photoshop screen set up as I do. 
See screen print below for an example of two images opened. You won't see both images on the screen but will know there are 2 open by the image titles on the top bar.
Picture

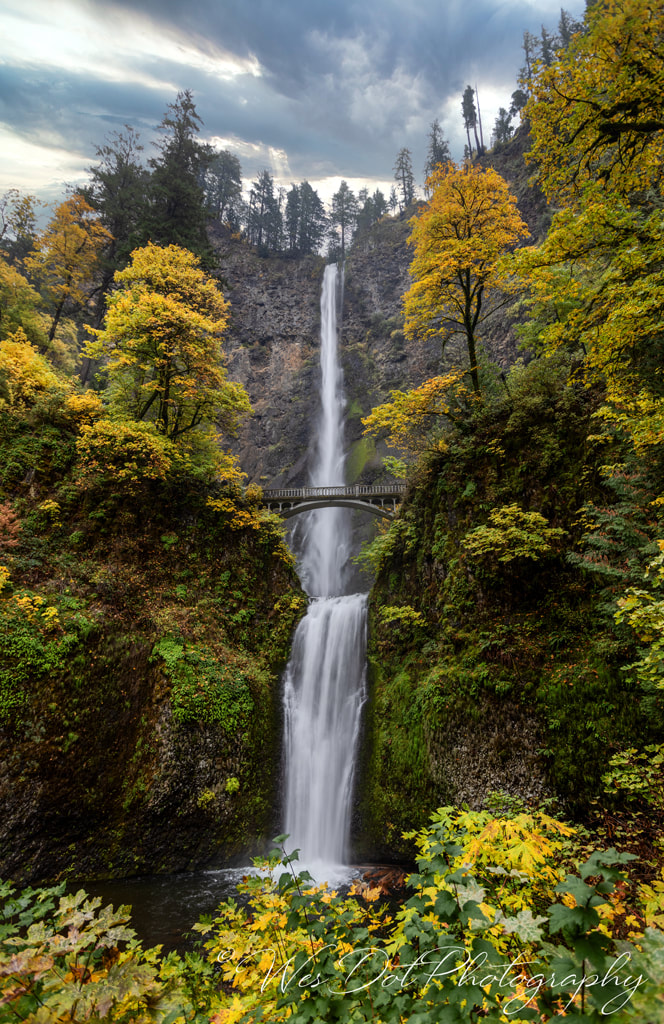
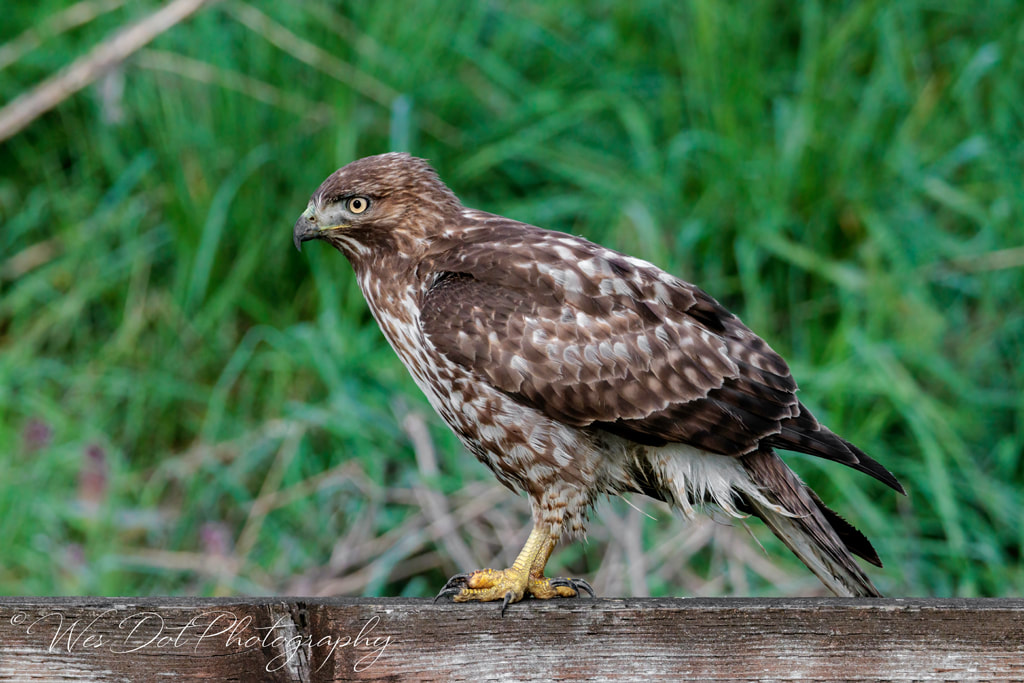
2)   Using the Copyright brush tool you created in the prior Blog post on the image click where you wish it to be.

3)   Click on each image by selecting the 'un-highlighted' image tab to make the next image active and run the 'Copyright Portrait' action.  Do this for each portrait image you have opened in Photoshop.

4)   When all images have the Copyright Symbols added and arranged to your liking you are ready to re-size the images and make them ready to add to Facebook, Twitter, Google+, your website or share online.  Here are the steps:

5)   Click on 'File' at the top left hand size of your screen.  This will open the drop downs.

6)   Click on 'Scripts' towards the bottom of the list which will bring out a 'flyout' box.

7)   In this 'flyout' box, click on 'Images Processor'.  The box that will appear next is the same as the screen print at the top of this blog post.  The items to pay attention to are:
  • 1) Select the images to process.   I use the 'Use Open Images' button as I want the images I've just copyrighted to be processed.
  • 2) Select location to save processed images.  I use the 'Save in Same Location' button as I like the copyrighted images to be saved in the same location as the original.  A new folder will be created in this folder called 'JPEG'.
  • 3) File Type.  This has several options. 
  •     As I save these images as JPEGs I use that file type by checking the 'Save as JPEG' box,
  •     I set the quality at 12.  If you are concerned about theft you can use a lower number.  This will make the image size small enough that if someone does try to print from this it will be pixallated if printed in a large print.
  •     Check the 'Convert to Profile to sRGB' box.  This is the best profile for the internet to keep colors from shifting.
  •     Check the 'Resize to Fit' box.  This box is crucial to resizing the images to portrait, landscape or square format.          For Portrait use W: 687 px  H: 1024 px
  •     Use all the prior steps for Landscape images with the exception of changing to W: 1024 px  H: 687 px
  •     The same for a square format image except change to W: 1024 px  H: 1024 px   
  • 4)  Preferences.  You can add Copyright Info which would embed into the images by typing that into the box and click on the 'Include ICC Profile' box if you wish.
  • Click on 'Run' at the upper right hand area of this box.  Each image that has been selected will process and re-sized images will populate into the new created 'JPEG' folder within the original folder.
  • CRUCIAL LAST STEP:  All the images that you have just processed will remain in Photoshop.  In 'File'  select 'Close All'.  As you close each file make sure you do not 'save'.  You do not want to have your originals stamped and re-sized.
Picture
0 Comments

Creating a Copyright Brush

4/29/2022

0 Comments

 
Picture
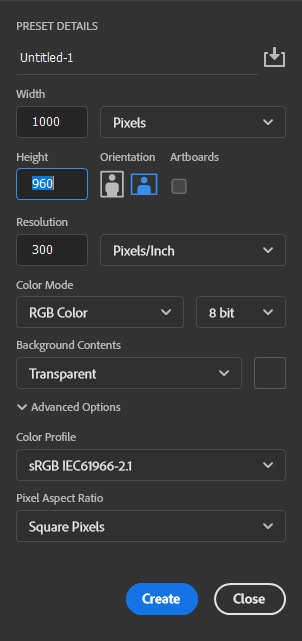
Step 1. Click File>New to create a new image in Photoshop. Make sure you use a transparent background!
1000 pixels wide
960 pixels high
300 pixels/inch resolution
Picture
Step 2. Use the text tool (on the toolbar) to create your copyright text. I found a free font called North Wave on the internet that I liked.
>I use a font size of 30 pt to make my text all fit and be as large as possible.  You may need a different font size depending on how large your copyright is.
>On a Windows PC, the code for the copyright symbol is generated by holding down the ALT key and typing 0169 from the keypad.
>On a Mac, you can create a copyright symbol by simply holding down the Option key and pressing G. That’s it.
>After you create your copyright symbol type in the rest of your copyright information.

Step 3. Use the Rectangle Tool from the tool bar to select the area around the text.

>Then use Image>Crop
>Edit > Define Brush Preset to create the brush and also you will name it. I call mine Copyright Stamp. The brush will now appear at the bottom of your brush table and is ready to use.

Step 4. To use the brush:
>Select the copyright brush from the palette.
>Adjust the size and/or color if you need to and and click once on the image where you want to stamp to appear. If your hand is steady enough you can click more times will make the text darker.
>Adjust the opacity to your liking. 30-50% is a good range depending on the subject.

IMPORTANT INFORMATION

At this point if you are using a copyright stamp on a full resolution image you can simply save this image.

I only use the copyright stamp on images I am going to resize for the internet where I use Script to resize. There is another post on how I do that. You NEVER want to copyright and resize an image and save it.

0 Comments

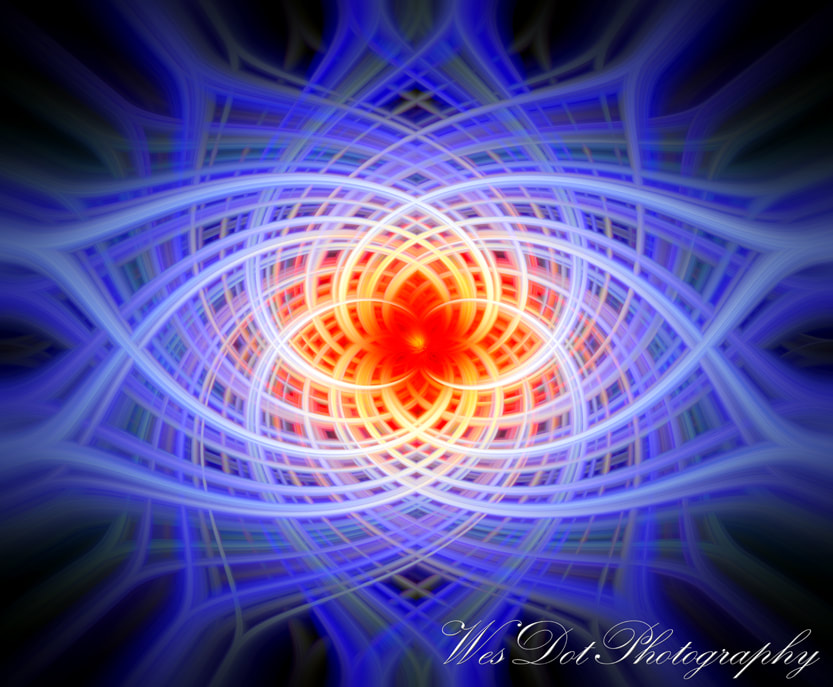
HOW TO CREATE AN IMAGE USING A TWIRL EFFECT

11/10/2018

0 Comments

 
Picture
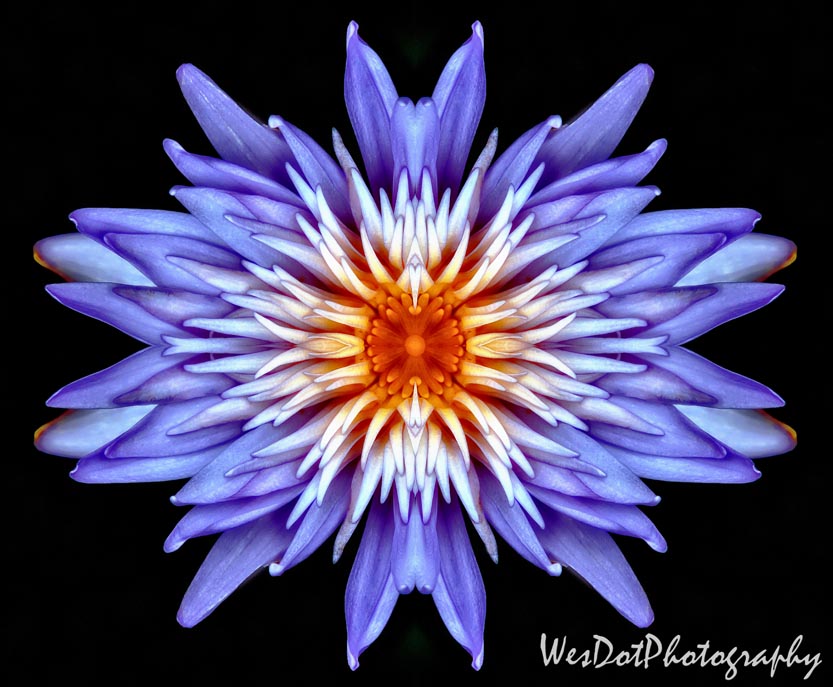
Start with any image.  In this tutorial I have chosen the image below.
Picture
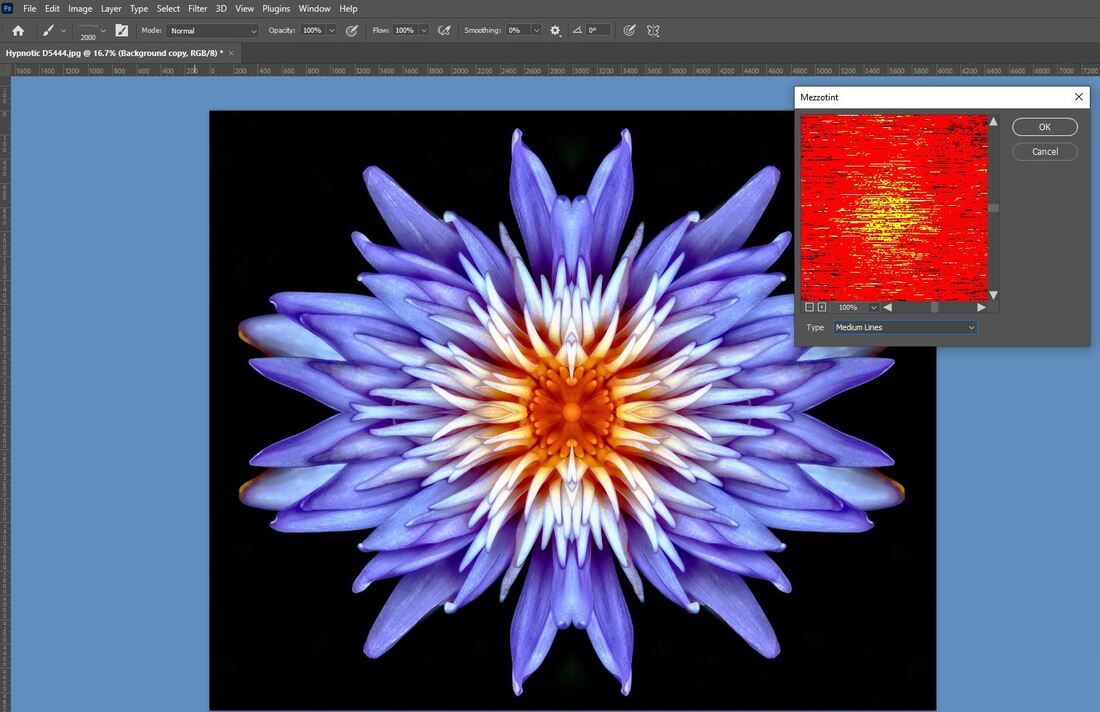
Step 1:  Using Photoshop go to Filter> Pixelate> Mezzotint> Medium Lines.  After you select Filter> Pixelate> Mezzotint you will see a popup box.  This is what you will see after selecting Medium Lines.  Click on the OK button.
Picture
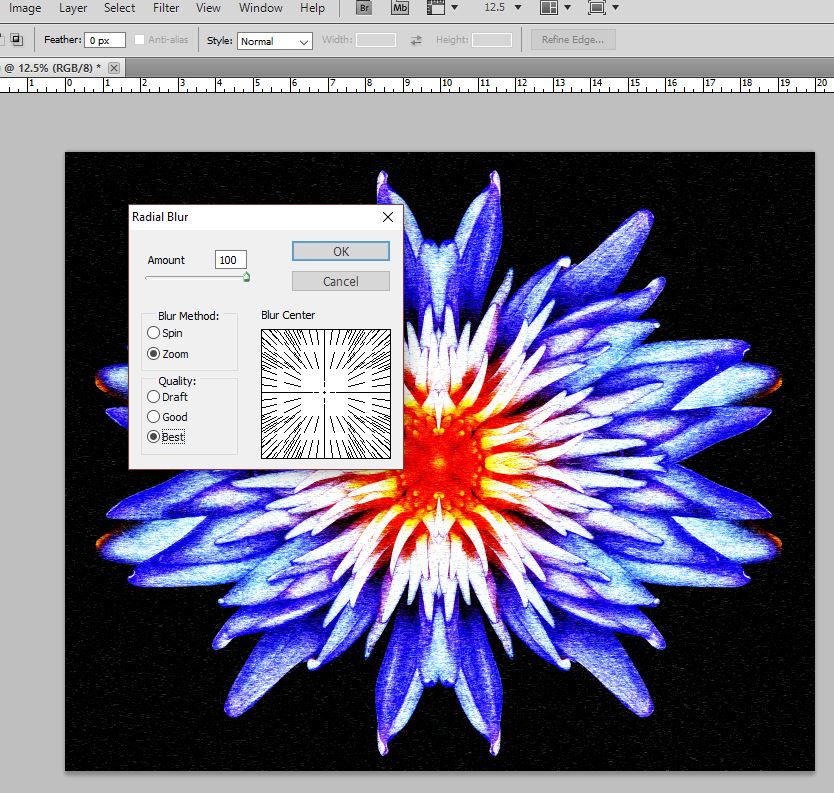
Step 2:  Again select Filter> Blur> Radial Blur.  From the popup, slide the slider to 100, blur method to Zoom and Zoom Quality to Best.  This is what the screen will look like.  Click on the OK button.
Picture
Your image will look like this below which is pretty neat all on it's own.
Picture
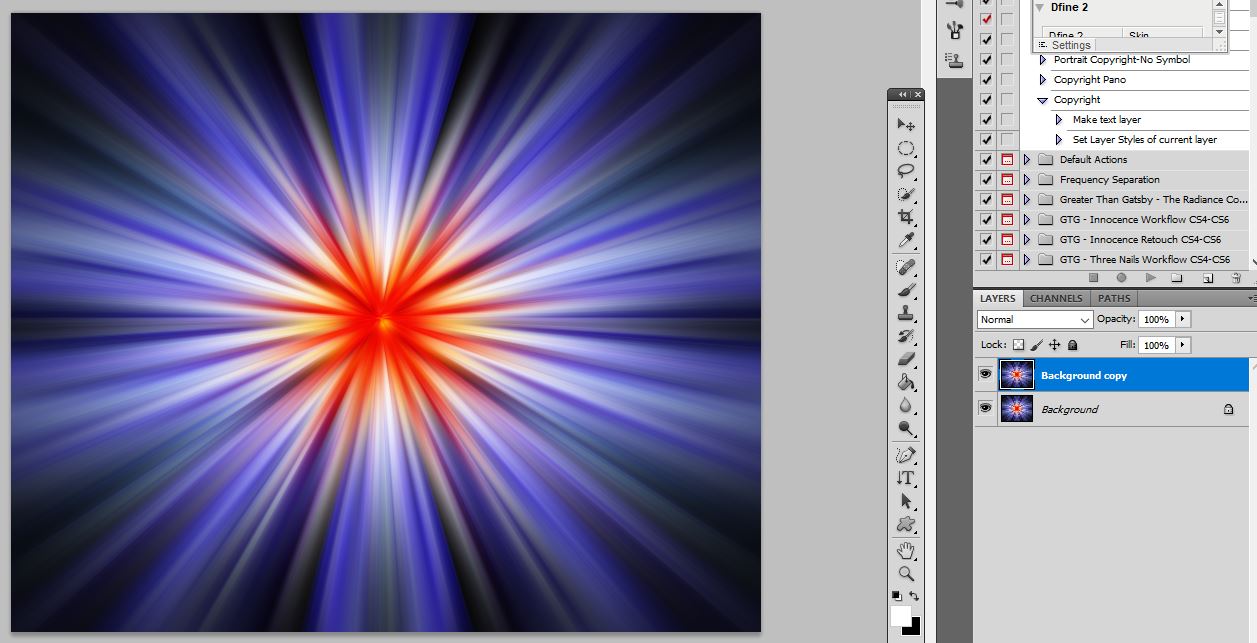
Step 3:  Repeat Step 2 anywhere from between another 3 to 5 times.  Then create a duplicate layer.
Picture
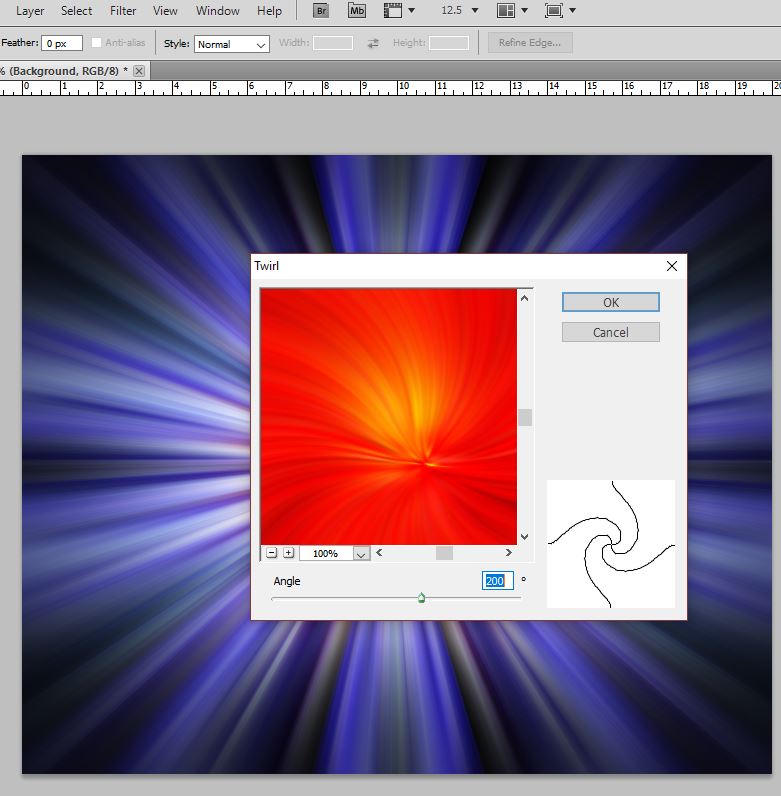
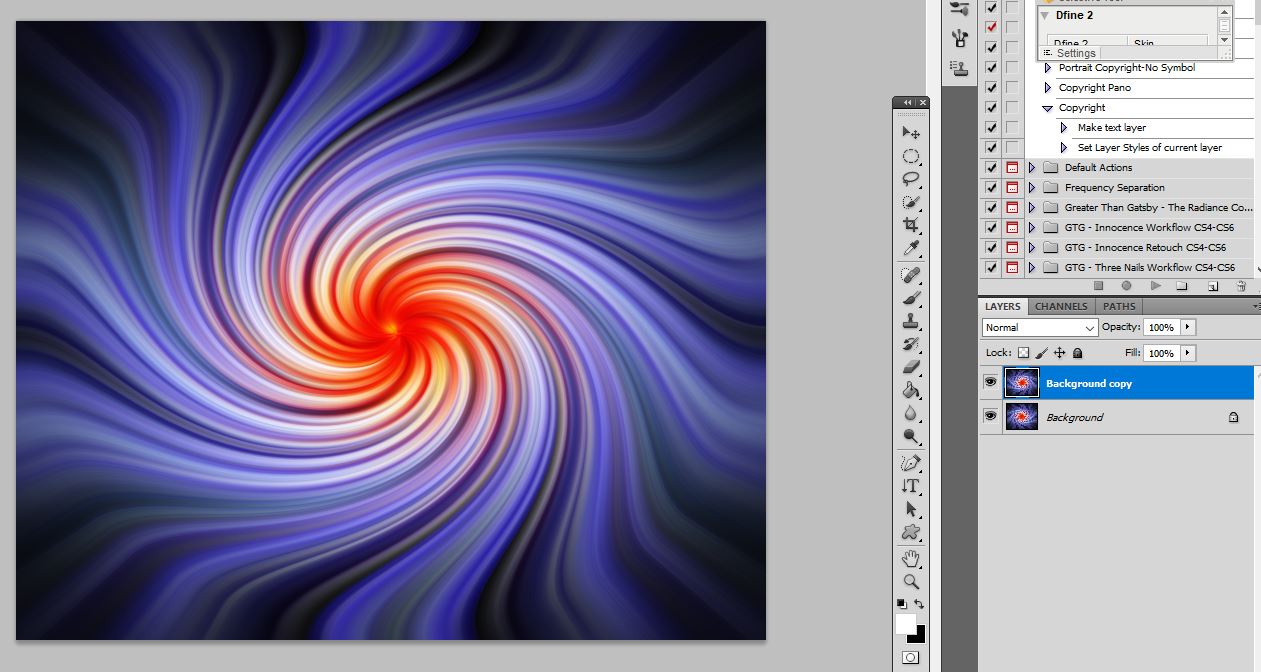
Step 4:  Select the Background layer to make it active.  Then go to Filter> Distort> Twirl.  From the popup drag the Angle Slider to 200 or whatever you would like.  In my example I'll use 200.  Then click on the OK button. 
It will appear that nothing has happened on your screen because the Background copy layer has not been altered yet.  This is okay as we will make changes to that layer in the next step.
Picture
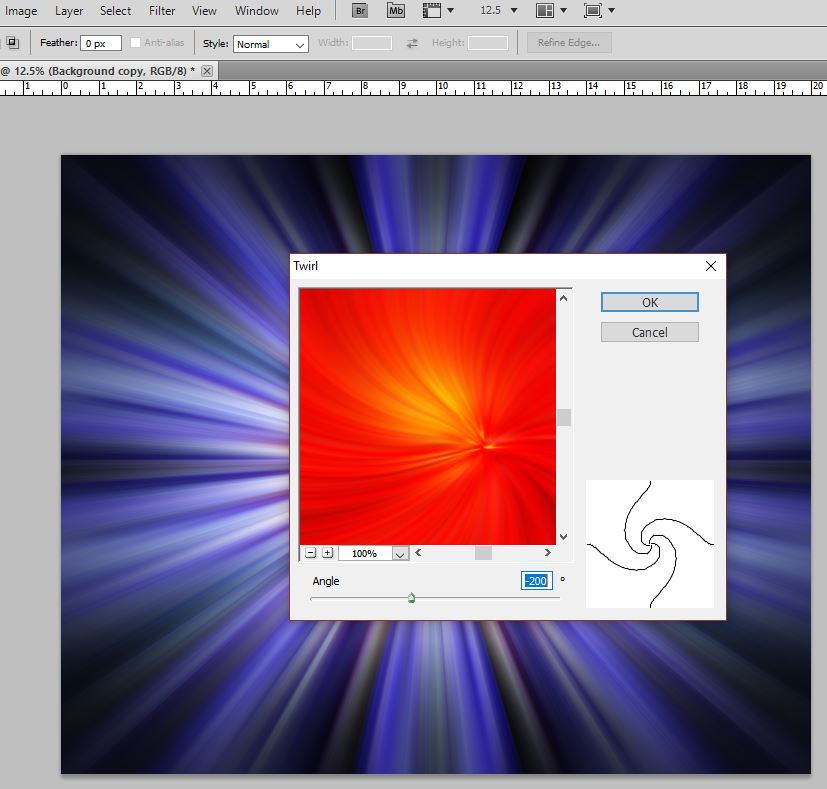
Step 5:  Click on the Background copy layer to make that active.  Then go to Filter> Distort> Twirl.  From the popup drag the Angle Slider to -200 or whatever you would like.  In my example I'll use -200.  Then click on the OK button.
Picture
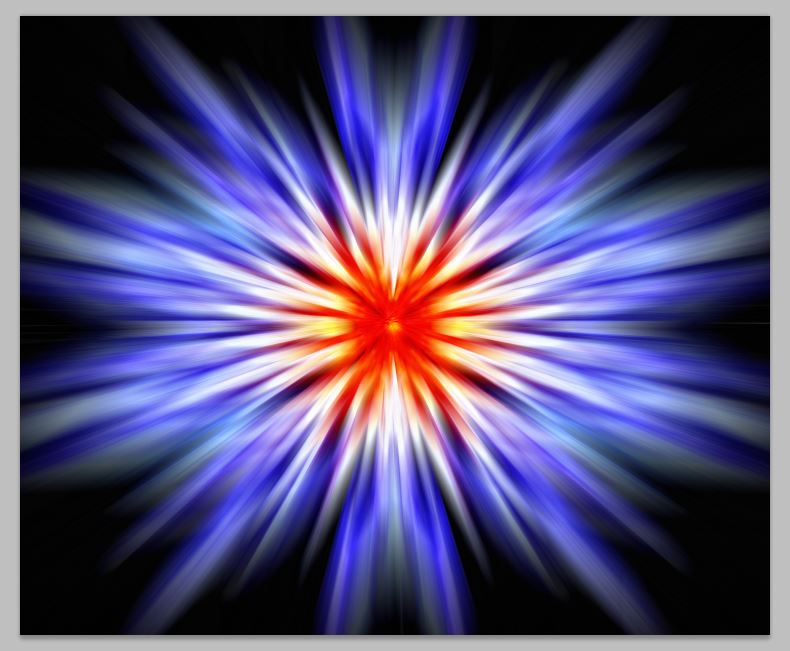
Below is what this step will create.  Again it's pretty cool but we aren't done yet.
Picture
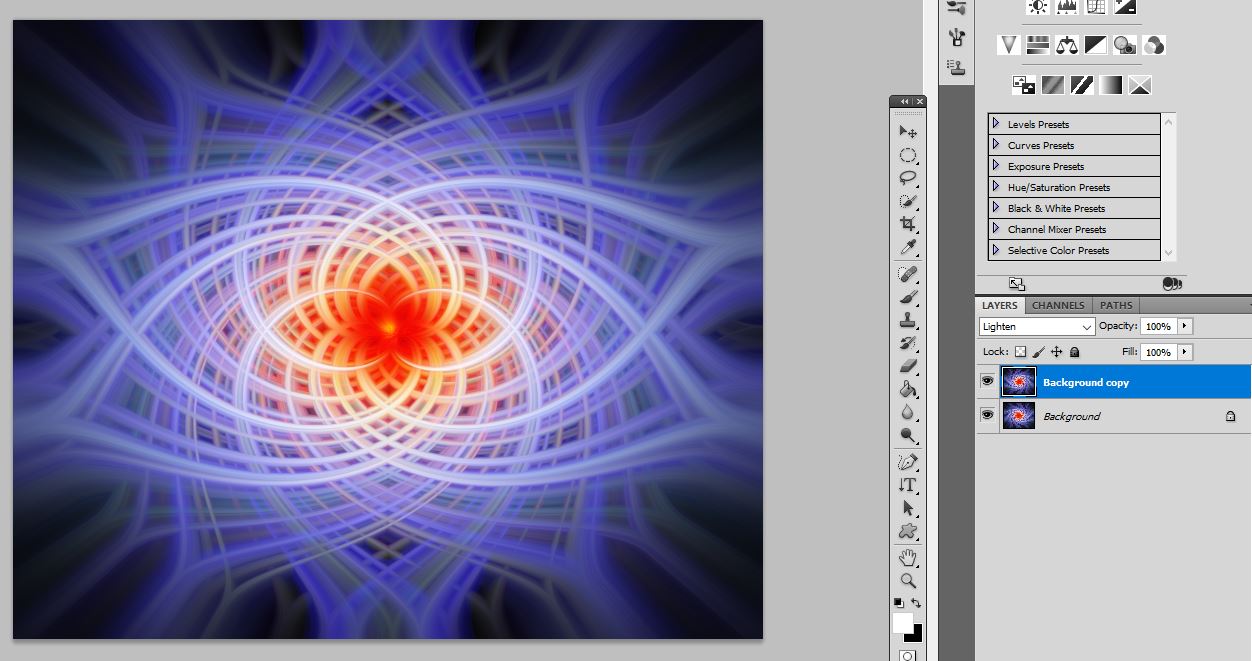
Step 6:  Now to make the twirl appear change the Blend Mode on the Background copy to Lighten and the twirl will appear.
Picture
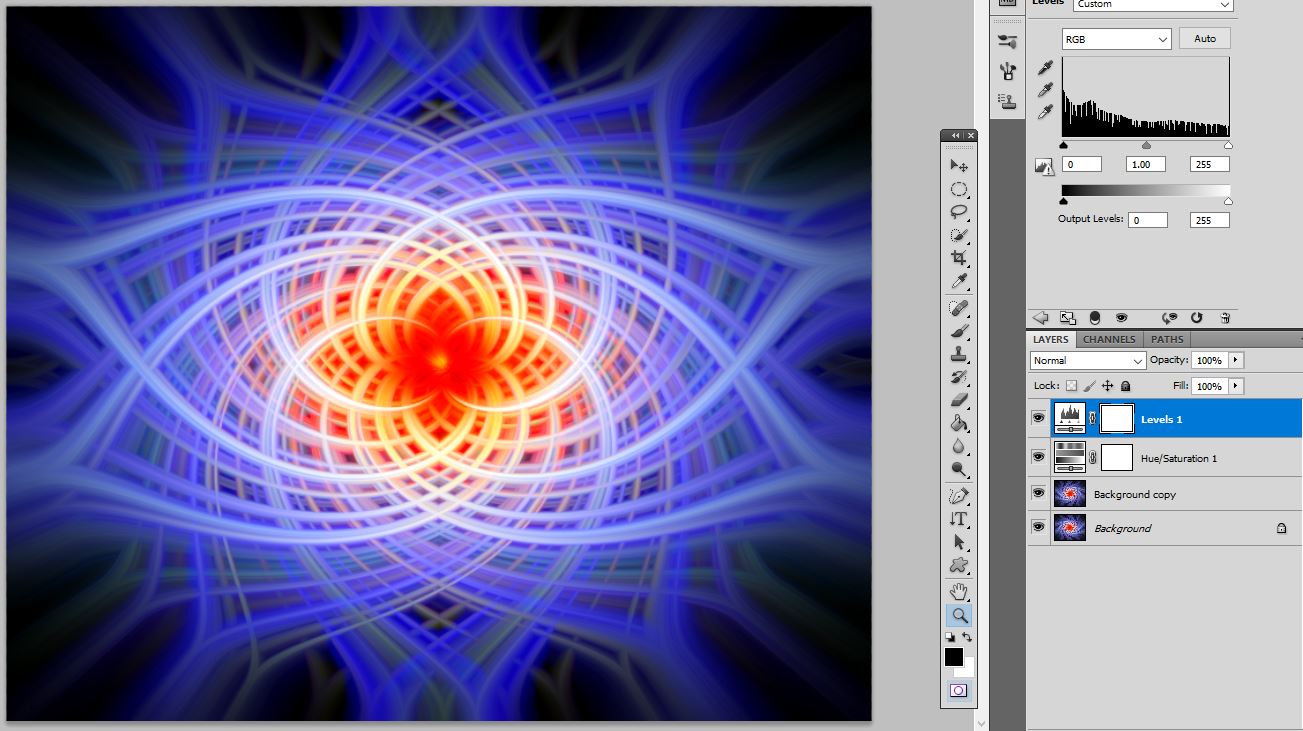
You can then add any adjustment layers to make the colors more vibrant, etc.  Here is the end result after increasing the Hues and Saturation on the Blue, Cyan and Reds in an Adjustment Layer.  I also selected the Black and White Points in a Levels Adjustment Layer.
Picture
0 Comments
<<Previous

    Our Flickr Photos

    Author

    Name:
    Wes & Dotty Weber

    Occupation:
    Photographers at Heart

    Favorite Camera:
    Canon  5DMarkIII and Canon 7DMarkII

    Favorite Subjects:
    Absolutely everything.

    Favorite Vacation Spot:
    Everywhere we’ve been has it’s own special beauty and some places like Yellowstone National Park and the Desert Southwest can be unlike anywhere else.  But to name a favorite is hard as we’ve not seen everything, yet.  

    Personal Motto:
    "Everywhere you look is a great image if you look closely”


    Archives

    July 2024
    February 2024
    June 2023
    May 2023
    April 2023
    April 2022
    November 2018
    January 2018
    November 2016
    December 2015
    July 2015
    January 2015
    February 2014
    November 2013
    July 2013
    June 2013
    May 2013
    February 2013
    January 2013
    November 2012
    September 2012
    August 2012
    March 2012
    February 2012
    December 2011
    October 2011

    RSS Feed

    Categories

    All
    Canvas
    Commerce
    Domain
    Email
    Fine Art America
    Framed
    Gallery Wraps
    Greeting Cards
    New
    Outage
    Prints
    Registrar
    Shopping
    Website
    Weekly
    Wesdotphotography

Copyright © Since 2000, WesDotPhotography All Rights Reserved.